
Today I wanted to button up as much of the motor as I could, fog was streching it's arms up the valley and rain was a threat for the next week. I put some clean engine oil in the tappets and slides, not wanting to use the engine assembly grease so as to not plug any oil passages. I dragged out my head gasket and made sure I had the correct orientation, then the heavy head was moved from the garage to the car and I climbed into the engine bay and set it on the block. Next the pushrods were retrived from the wooden holder I had made to keep them in order, and slid into position. At this point head bolts were dropped into the holes to locate the head properly and a few turns of the threads made by hand.
The newly rebuilt rocker shaft was fitted. No, it wasn't perfectly set up. :^( The # 6-7 rocker arms didn't line up on the valve stems, but neither did the holes for the #4-5 blocks. So I just tapped the blocks over with a hammer and the rocker arms lined up! :^)

Dropping the rest of the bolts inplace the torquing process was started. In the past I've just gone straight to 90ft-lbs and not had any issues. Lately I've been reading online of peoples torquing in sequence so I thought I would give that a go. The torque wrench set to 50ft-lb I went thru the entire 18 bolt sequence starting in the center and working outward as described in the manual. I reset the wrench to 35ft-lb and did the smaller bolts holding the rocker shaft blocks. Again the wrench was reset to 70# and the main bolts tightened, again reset to 90ft-lb and go thru the sequence a final time. Sure it took longer but in some way seemed easier than just going to 90#.


Next the waterpump was gooped up and installed, some of the easy electrical wires connected; water temp and fuel shutoff. The plug put back on the flywheel timing port, vent hose for crankcase.

By then it was getting dark and cold so I quit for the night. The next day I had to attend a funeral so I would get nothing done. Julie, sorry to see you go! :-(
Sunday came around and in the mid day I attended my grandsons season ending baseball game. After the game I dressed for the cool weather and went about installing the intake and exhaust system. Here the extra stud I had bought on Friday came in handy as I could replace the bolt used on the exhaust with the correct stud.
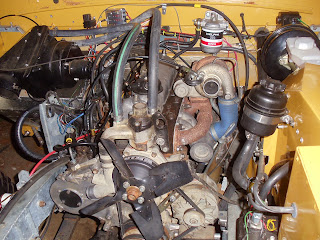
It took awhile to bolt on the intake then the exhaust with the turbo, I cleaned up the turbo hose inside and out . I reused the gasket from when I fixed the exhaust leak. The exhaust down pipe was also connected.
Then I moved over to doing the injectors, new domed washers were installed and all the soot removed from the injector nozzles. The injectors evenly torqued down to 14ft-lbs. The timing chest vent on the bottom of the chest was siliconed and installed. I even put on the heater hoses.

There is still some tweaking to do with hose/wire placement, but as it was geting dark and the clouds moving in I stopped for the night. Most of the holes into the engine were now closed and rain not so much a concern. As I went into the house I felt the first drops falling.
It did rain slightly last night, but we did have heavy winds, I'm glad to have gotten it all buttoned up so hopefully nothing got in the motor. More trace rain and wind expected for the next day or so. So I have updated the blog!
No comments:
Post a Comment