Saturday, November 14, 2020

Land Rover Tropical top leak fixing

 14 Nov 2020


Aarrrrrgggghhhhhh!


There was a little sprinkling last night I got 1/8" of rain in my gauge. So I checked my new to me Trop top to see that my leak repair had worked. Well, it had on the drivers side but the passenger side was wet when I put my fingers inside on the drip rail.

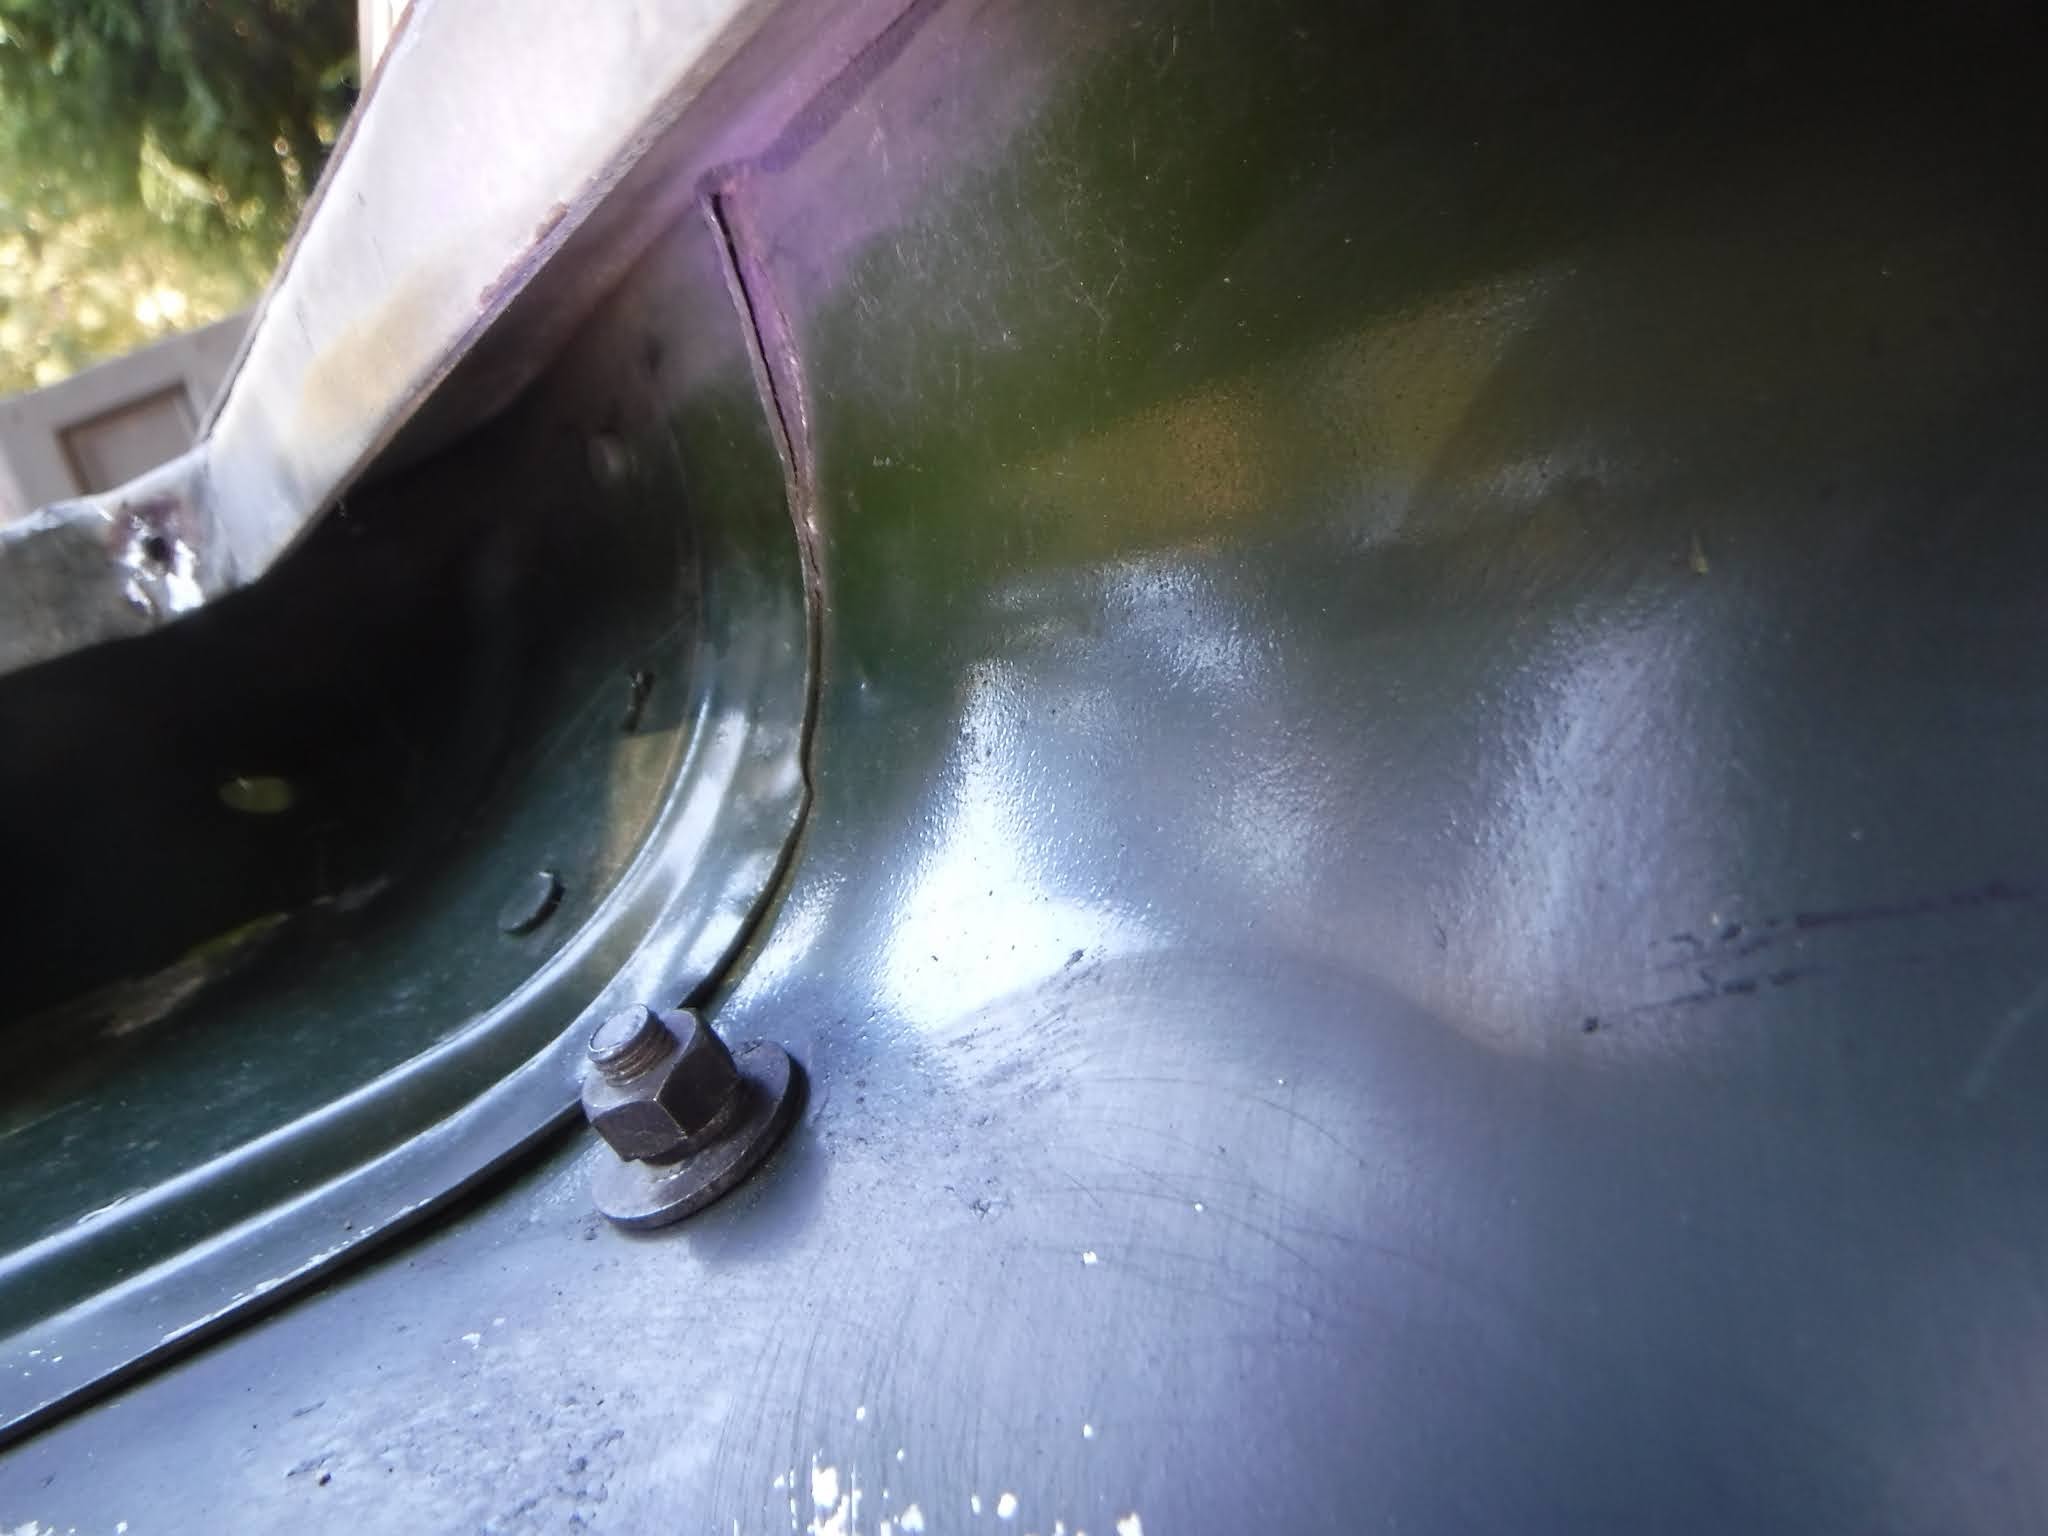
   Later in the afternoon I checked it out and upon investigating I found a poor rivet job at the right front corner right at the seam.

Check it out and then subscribe to my blog!  Wink, wink.


The ends of the rivets didn't catch the skin!


I used a dentists teeth cleaning probe to check the gap, the first pic is to let you see the scale and the rest to show how far it would go in, without force I might add.


So I drilled out the rivets to 3/16" since that is the size of the pop rivets I have then used the probe to scrape out what I could from under the skin. Next out came my old stash of duct seal from Scotty and I rolled a small length of it, about 1-1/4"l x 3/16"w, and starting at the rear I jammed it under the skin with a flat screwdriver. Once that was all in I rolled up another piece and pressed that into the next section, I did this 3 times, hopefully sealing the gap.


After I had most of the duck seal pushed in I got the idea to heat it up so it would go in easier. I used an electric heat gun and heated it from the underside so I wouldn't peel the paint. Vise-grips makes a "C" style clamp and I used one of these to hold the skin down to the drip rail while I placed the 2 pop rivets. This action also squeezed out excess duck seal.


Then a real C clamp was used to flatten out the pop rivets best I could and cleaned up the excess seal.


Now it's going to rain again this week so I'll find out how I did.................


17 Nov, 2020

Well it rained today and sure enough the roof leaked right where I affected my repair. Following is a link to my youtube video of my detecting the source of the leak.

https://youtu.be/o9FSUKcKm5A


I used my air hose to blow gently under the skin to see water and bubbles in the drip rail. Then I heated up some of my duckseal to make it more malleable and cram it into the gap and make a seal. The good news is that where I had just put this did not leak. There is/was a good 2 more inches in the front and some sporadic leaking behind the seam.

It was difficult to get the seal to stick since all was wet so I crammed what I could in and called it quits until it dries out in a few days.

Here is what it looks like for now;


24 Nov 2020

Well it dried out more and then I used a hair dryer to be sure. Then I took out one of the solid rivets and replaced it since I didn't like how it looked.

The air hose was used to check for water and I didn't see any. So I made an executive decision and I used shoo goo on the seam of skin/rain gutter. I put it on thinly and along the edge of the leak and past it by a couple of inches. 

Next I got down on my knees and said a prayer that this time the FRELLING THING doesn't leak!

It will take a bit for me to be confident it is not wet on the inside and there is no rain in the forecast, soooooo............................................I wait.


Friday, October 23, 2020

Land Rover headliner install/option part 2

 23 Oct 2020


I know this is dragging out , but I am moving along.


14 Oct 2020


Got up the next day with the intention of putting in the front section and hopefully the back too.

The front is also difficult due to the sloping section and the complex curve in the corners. So I started out by cutting down the overall length and fitting the side to side  and then worked on the front corner until I got one to fit.

I sprayed glue on one quarter of 1 side and fit it. I thought it went well, little did I know that I had not gotten the rear section even with the drip rail, I didn't find that until I put the roof on......sucked.

Carefully I moved across the top spraying and sticking and when I got to the other side I trimmed up the front corner and glued it in. Eventually getting it in.

Just now I realized I took no pictures that day. It was a long hot day and the job was way more fiddly than I thought, IIRC it took me 4 hours(and still I f'd up).

15 Oct 2020

Now to do the last section the rear! This should be quick and easy as it is just a rectangle, right? No is the simple answer.

Using the old liner I cut out a piece for the rear above the door.


I didn't realize that the old liner was smaller because the headliner dropped off the roof due to insulation. So I had to make another larger one.

Then I glued in the top piece working in 1/4 sections as I glued it down, then I ran out of glue and had to go get another can,   sheesh, always something.

But I got it in.


I didn't glue down the ends at the ribs because;

1) I wanted to run wires for lights

2) I was not sure how I was going to finish it off with trim


Don came over on the 17th of Oct and helped my lift the roof back on


Then started the long process of bolting it all back together over the next couple of days. Overall it went well except I had to modify the overhead bins a little to fit the ribs.


Then it was time to tackle the electrical; Back up lites, interior lights. I looked around online looking for better interior lights and found a LED pivoting light, and ordered 1.

 https://www.amazon.com/gp/product/B00JAJ7Q68/ref=ppx_od_dt_b_asin_title_s00?ie=UTF8&psc=1

In the front rib I drilled a thru hole into the light holder and set a grommet. The blue tape is to prevent the drill from marking the vinyl.


I ran a hot wire for the light it will connect over by the drip rail. A ground was screwed in under the fixture.


I spent a frustrating hour chasing power. It went like this;

Couple days earlier I bumped the hot wire and caused a spark.  When I finally hooked up the new light it came on bright and then dimmed. Repeatedly.?? My 12v test lamp showed no power. WTF? So I thought it was a loose connection and started chasing it down the line. I checked the fuses all good! (Missed one). Took apart the dash to trace wires, grrr. still no power. Rechecked the fuse box and saw I missed the 1 that was blown. 

That was when I found out that the Blue Seas fuse box I have sends a small amount of power through the fuse box some how. When I hook my 12v test lamp to neg on the battery and touch the out side of the blown fuse the test lamp will light and the blown fuse light in the box will light. IDK the internal wiring on the box, but weird......

Replaced the fuse and the dome light worked as advertised. But I'm not happy with it as it doesn't shine into the seat area but will light up the cubby box. So the search goes on unless I shim the fixture to get a more useful angle.

28 May 2021 update;  I removed this light and installed one better for my needs, read about it here;

https://poppageno.blogspot.com/2021/05/land-rover-109-dome-light.html

My neighbor Bill helped me lift up the rack and I got that bolted down, installed the awning and the propane mount and roof light bar.


No pictures, but I put on the sand ladders and have to figure out where to mount the Hi-lift as the cross bars for the rack are now too far apart for the old mount. Why? Because I went from 5 bars to 4 since I didn't want the mounts breaking the Alpine lights. 


Friday, October 16, 2020

Land Rover headliner option/install part 1

 16 Oct 2020


Well it has been quite a last couple of months, what with the fire and Covid. It did give me time to think and research what I wanted to do about my headliner.

I spent time looking at stock replacements such as Exmoor Trim or Badger Coachworks and a multitude of online fabric headliner suppliers from marine and auto industries. Cloth or vinyl, Zebra or some other print? Padded or not, self adhesive or not. Overwhelming at times.

Finally I settled on an off-white vinyl with a 1/4" foam backing from Albright's Supply 

 https://www.albrightssupply.com/

That I bought through ;Amazon;  https://www.amazon.com/gp/product/B07MM3551D/ref=ppx_yo_dt_b_asin_title_o03_s00?ie=UTF8&psc=1


Because the ribs in the roof are around a meter apart and the width is 65" it took some looking and planning to get the right size and have fewer seams.

Now about those ribs,,,grumble,,grumble..... mine are not on 37" centers, from front to back they were 36" 37.5" and 39 to the back wall. Then to top it off they are not even being some 1/2" off from one side to the other.

Cutting 3 x 66" pieces off in 2 x 40" and 1 x 37" I was set to do the job. Now the roof needed to come off.

I contacted fellow Rover owner Don from nearby and arranged a day/time to take it off. 

13 Oct 2020

The day before I disconnected the 'lectric's and unbolted the roof. In the morning Don came over and we went over the plan and I climbed inside and lifted the top on my back and turned it 90°.

Once outside Don and I carried it over to the sawhorses flipped it on its top and Viola! Ready to go.


First thing was to clean it up by removing the PO's paint on the drip rail.


I tried a variety of methods, acetone, various wire cup and wheels, a worn out fine wire wheel in a corded drill worked best;


 Once that was done and some burrs taken off some edges I used my air compressor to blow the dust out. That's when I saw a puff of dust come out the side if the front seam. Investigating further I found all the original seal was gone! Using a flashlight I could see through the seam. So on the inside I used Permatex blue gasket maker and on the outside I used a small screwdriver to cram some waterproof ductseal in. It is a malleable waxy stuff I got a fistfull of 50 years ago. Just to be safe I did both sides.


While the goop was drying I set up to do the center section. I figured this would be the fussiest and the key to doing both ends, especially since I didn't know how I was going to marry the sections.


I had to fix the strips that hold the ends by the Alpinelites and fit the bolt holes for them and the sunsheet as they go through the fabric.


Next came locating the trim pieces for the vents, to do this I lifted the edge and used an icepick to approximate the hole in the fabric, then set the fabric back down and poked the icepick until it found the hole and jammed it in.


Then the trim was located using the icepick.


The pick was replaced with a screw loosely holding the trim, gingerly poking around I found the next hole and jammed the pick in. On the first one I worked my way around.


The trim ring next to it was also done so I could glue down one side.


Before they were glued though I cut out the opening for the vent, I used a safety razor, but wish I had an Exacto blade for the handle and point.


Once all trim pieces were done and openings cut out the end strips located I was pretty set for gluing, but first I used a hole punch to make the holes more visible and the screws easier to place.


I taped off for overspray and doing one side and then t' other I sprayed 3M 77 adhesive and fought the fabric into place, attached the trim rings and end strips.


And that was about 5 hours work! I needed a break,


Thursday, August 27, 2020

Land Rover delay------Fire!

 27 Aug 2020


Well, there is going to be an undetermined delay on the next project.

On 15 Aug 2020 the State of California experienced an unusual lightening storm with over 4000 strikes setting 650 fires.


One of these fires, the CZU fire, tore thru long unburnt forest in my County. Because of so many fires resources were limited and many of them could not be stopped. Every County in California had a wildfire except San Francisco County.

The fire raged and eventually 77,000 peoples were evacuated including me. I was evacuated Tuesday 18 Aug 2020 actually leaving around 0300 on the 19th with most of my camping gear and those valuables I thought of at the time.

As you regular readers will know My roof was just painted and I was researching doing the headliner and because of this work my roof rack is not on. I did grab my OZtent RV3, but had to leave my Rhino Rack Batwing awning as well as the gearbox I just picked up from Timm Cooper. I left my trailer since it is full of junk right now, plus I was going to a motel and didn't want to have the added hassle for parking a trailer would bring. Besides, it was just going to be for a few hours, right? Then they would have the fire out, right? Right?

Wrong. The forest was dry and the flames hungry, they ate through California's first State Park, Big Basin, Then climbed the side of the Ben Lomond Mountain, pluton heading South towards Santa Cruz and down the Hwy 236 towards Boulder Creek and my house, while the West side devoured it's way to the Pacific Ocean. Eating the 1909 Park Lodge and so far 634 structures and 81,000 acres with 1 death.

I am OK my 109 and I got out, but not my motorcycle and many family heirlooms.

As of today it seems they have started to gain control, this morning 19% containment, and are starting to repopulate some of the more distant evacuations.

Right now my house is OK, it is 1/2-3/4 mile from the fire front and the town of Boulder Creek is in between. It will probably be a week or more before I can go home.


Here are a couple of pics. 

From my neighborhood Wed.


Smoke over Monterey, California


The fire went through Swanton Pacific Railroad; https://sprr.calpoly.edu/


And that's if for now !

Like and subscribe