When I did the rebuild of my 109 I took one of my front axle housings and had it galvanized along with the frame, intending on putting it in my build.
I never got around to it, until now, though it is not in yet it is ready, finally.
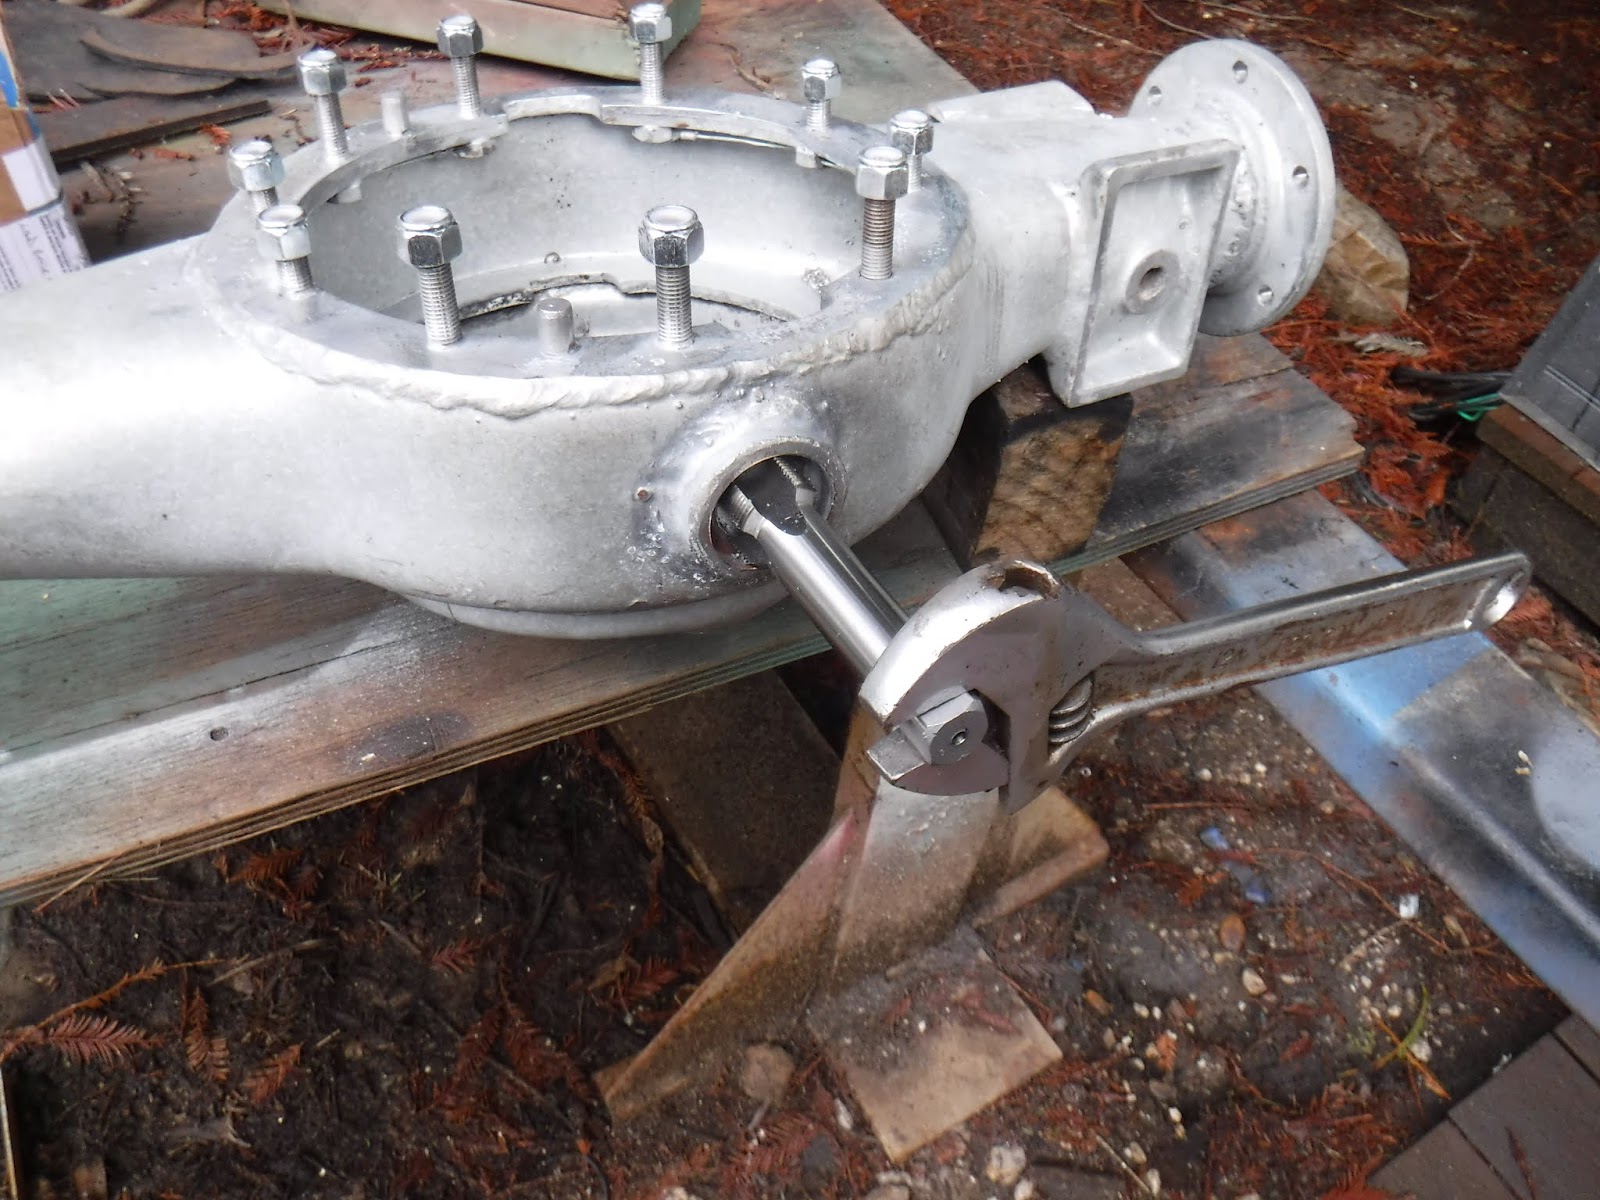
Setting about to clean off the excess zinc using a propane torch I started on the flanges, heating and melting and wiping with a wet rag or blowing with my compressor. Finally drilling the holes to clean them and using a fine flat file on the mating surfaces.
Next came the special bolts which hold in the diff. These were heated until the zinc melted and then blown off which removed a fair amount of the zinc. Then trying heat and a wire wheel on a cordless drill. Neither method would get the last 3/8" of threads next to the housing clean.
What to do?
Oh heat up the zinc and unscrew the bolt.........................So I cut the safety wire on one bolt heated it up and began to work it out. Then the head broke off, leaving the threaded portion still in the hole. No problem, vise grips got it out now to find a replacement. What size are they?
The parts catalogue just says "special bolt". My thread gauge showed 20tpi. About a week online and I got the size from the Series 2 club forum members, 3/8" x 20, However no one had a spare bolt. I did put out a call for taps and dies in this size as they are not common in the US. I also asked for the size and a tap for the axle housing drain plug. Again the S2 forum came through.
The drain plug;
The drain plug is 1-1/8" x 16tpi. Something was wrong with mine none of my plugs would screw in more than 1/8th of a turn. I needed a tap........they are not cheap or available in the US, but I found a Chinese supplier for $30 shipped online and I bought 1. https://www.ebay.com/itm/233330955793
Two S2 forum members, Winchman and Glenanderson sent me 3/8 x 20 taps and die and with then I was able to chase the special bolts and the 1 bolt hole. I found the special bolt I needed at PABlanchards (long one #1564)where I also bought a dozen nuts(#2513220) for them.
The replaced special bolt;
Running the die over the in situ bolts was a pain in the ass. because the die was round and not hex I had to use my die holder, but with it's 2 long arms I had to reset the die about 6 times each revolution. It took about an hour to do the first 4 bolts..............I needed something faster.
What I came up with was that since I wasn't cutting new threads I could drive the die with some stiff rid in the clearing holes. So I found some rod and bent it in a U and used a cresent wrench to drive the die and chase the zinc out.
I did the next 5 bolts in 15 min.
Once that was done, I put in the new special bolt (long one-#1564) and safety wired the head to the rest of the bolts.
The new nuts were placed to protect the threads and for safekeeping.
Now I waited for the tap to come from China. When it finally arrived I went out between the rainstorms and ran the tap thru the hole.
It went in easy enough meaning I had the size and thread count right, then it hung up meaning I found the pinch point.
So using a cresent (adjustable) wrench I worked the tap around and thru the bad part and chasing out the excess zinc.
The plug threaded in easily by hand and pulled up tight with a wrench! WOOT! WOOT!
I already had a 1/8 BSP tap for the axle breather and a 1/2 BSP for the fill plug. With these done and the axle end seals(#244150) in place it is now ready for me to build up and install in the 109. That will be a day or 2 job next year after the Wet ends.
On my last trip to Nevada there was an intermittent clunking when in 4x4, most noticeable in high range probably due to the lower engine noise.
When I came home I checked things out and found my front prop splines worn on the male end.
Finally getting around to working on it and found this; all 88-109 front props are the same, part # STC1898. There is a replacement male spline section available part #601790, I only found that on Rovah Farm.
I pulled the shaft and had a go at replacing the splined section. First I tried to grind off the weld but that was too difficult to see what I was exposing. I was looking for the inner wall of the tube section at it's longest point.
So I used a cutoff wheel and removed the splined section.
Then I carefully ground down the remaining flange part of the spline, hoping to find the tube walls. This took maybe an hour and a half to 2 hours, I didn't really keep track of time, but......
Finally I got to it this morning. However I'm not satisfied with my results, more on that later.
Once I knew I had ground through the weld and found the side walls I had to remove the rest of the insert. That wasn't easy either. I finally welded a 1/2" rod to the insert and with some hammering and wiggling and brute(me?) strength I got it out!
Here is the layout of the splined shaft bits;
OK, Why don't I like what I did?;
Although I tried to keep the grinding to a minimum, a lot was dependent upon the weld. One side of my grinding job came out 4mm shorter that the other. While I know that can be made up with careful alignment when welding in the new spline I am not comfortable with the balance issue of the shaft with all this extra weld on one side. On the other hand I could have squared off the tube by grinding down the high side, but would this have left the tube too short? I don't know.
So I bit the bullet and ordered a new one from Trevor at Rovah Farm.
Well the new shaft came in, it is Britpart.
I thought it might be for that price. What I din't expect was that it has been redesigned and didn't look like my old one or the sale picture on the websites. I can see why it was redesigned, it looks cheaper to make. I hope it isn't a cheaper version of materials..........................time will tell.
I freaked out a bit and called Trevor, fired off an email to him and checked another half dozen website to see if the number was correct. It was and eventually I decided to just put it in.
First I took the slide apart and saw that there was very little grease on only 1 part of the splines, so I pumped grease into the splines and the u-joints.
The new is on top, the bottom is a rear but shows the old design.
Then I got out a piece of old carpet threw it on the mud and rocks in my drive and put it in.
In the rain. I was worried the sliding section would hit the crossmember, but it looks like it will clear everything.
I got soaked from the naval down and there was a drip hitting me on the forehead while I did the front bolts. It went in just fine.
After cleaning up Trevor called and informed me of the design change, so I could rest easy/er.
A quick drive in 4x4 around the neighborhood and yep, it works.
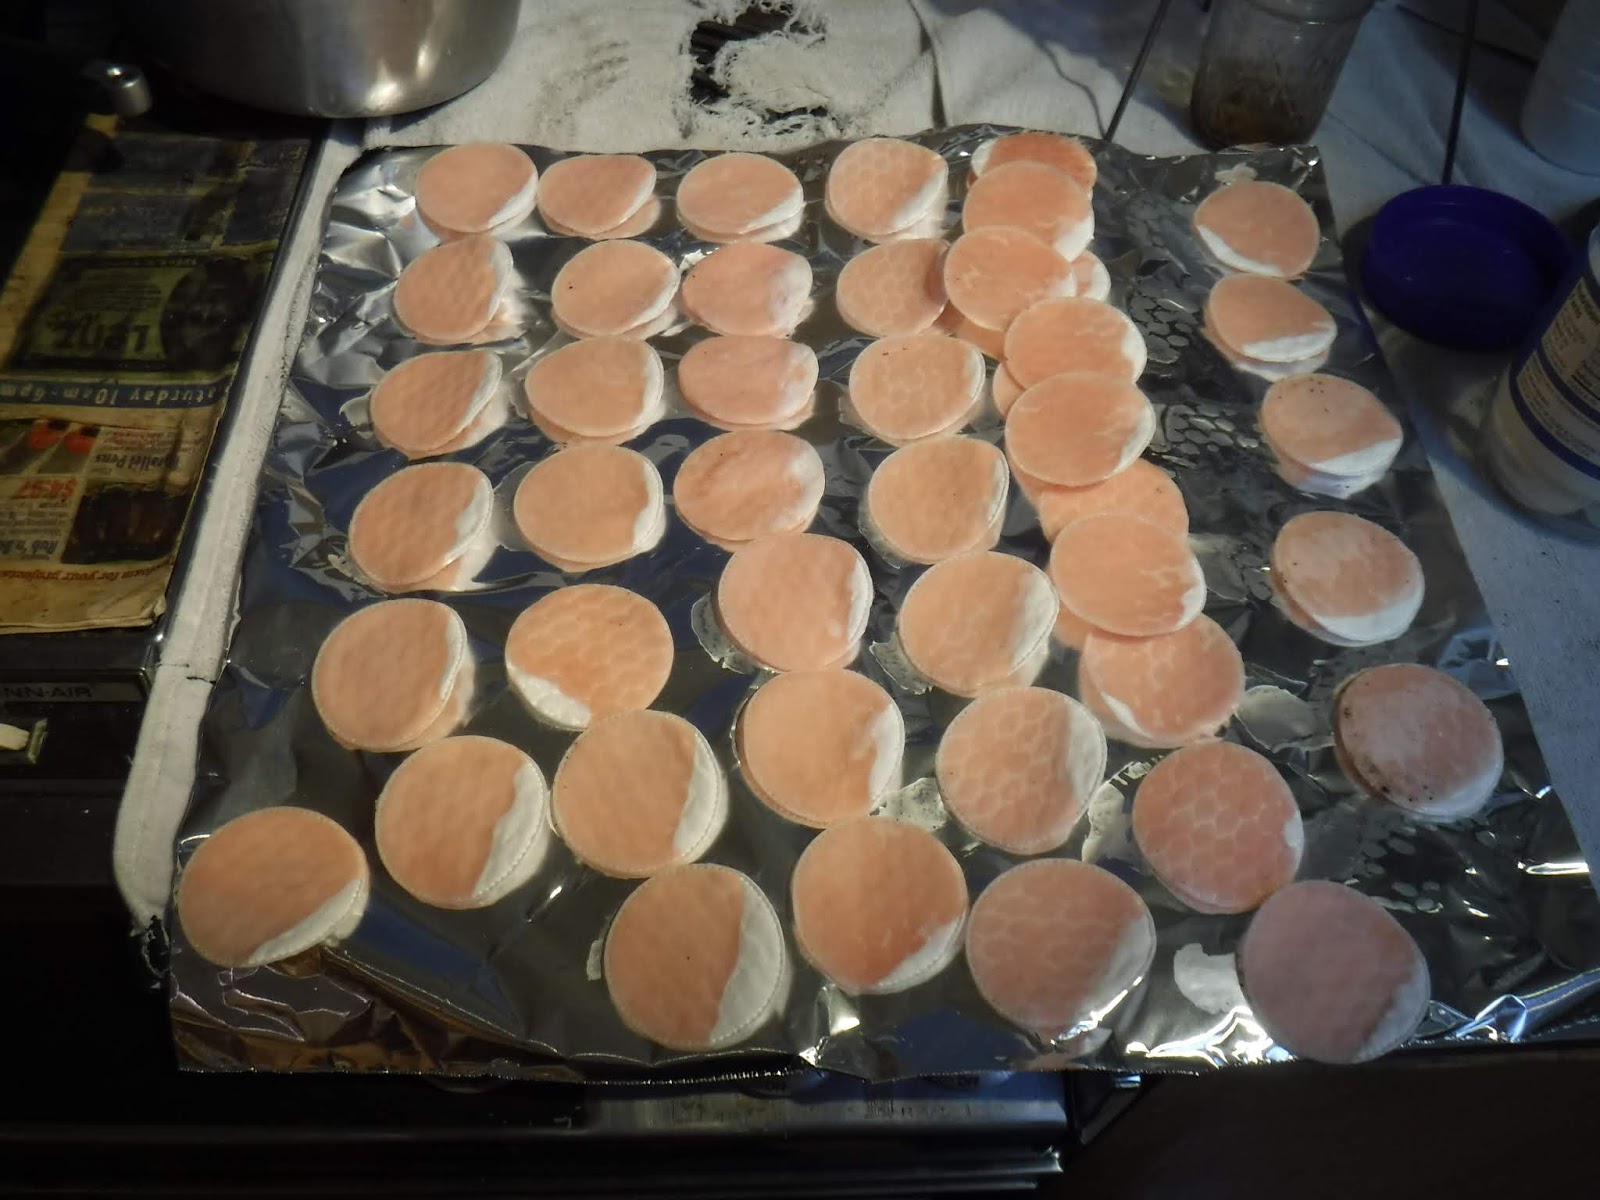
I saw these online somewhere and learned to make my own. They really make fire starting easy.
Go to the makeup department of your local grocery and pick up a pack of cotton round pads. I get mine at Safeway.
I have whats left of 5lbs of wax I used to use to clean and wax my bicycle chains. It is in an old pressure cooker. On low I melt the wax and then dip the pads leaving one edge clean.
The clean edge is where you light the starter.
I finished off my pack of pads.
Then I put them in a container which goes in my "kitchen" box.
Just put 1 of these under your kindling and light the edge.
Fires right up and you'll be warm or cookin in no time
0700 and woke up, got up dressed in clean T and underwear, fixed up breakfast and coffee. It had really warmed up! It was 24°F
As I lay there last night I had been thinking I've not been this cold since I was in the Navy. When I did my mess duty I worked in the food storerooms. One of the freezers was 0°F, when we would take on food I would work in there in a T and cut-offs while stacking TONS of steaks, burger, fries, frozen vegis, we would get 4 types of steaks and there would be 6 tons of each type! I had to work fast to stack from floor to ceiling and worked up a sweat.
After breaking my fast I sorted things and repacked the 109 and again I was ready for the road home of some 400 miles. It was 0900
Heading south thru the campgrounds I could see it was not very used, but scenic. FSRD421 thru camp intersected with 420 and I turned right onto it. About a half a mile later I spied the road I thought I should have come in on from Secret Basin, or so I thought it was.
After some mental debate I took it, Tour of Discovery again, what the heck I had time, fuel, food.
It took me up a wide valley and into the mountains, the track wasn't bad, I actually came out in 2 hi. Couple of places needed to go slowly.
As I monitored my gps track I could see I was converging on my Secret Basin track. I then came to a rocky down hill and I had to stop to check it out. I got out to walk down and see if it was doable.
When I walked over to the edge and looked down into the valley I saw
I was above my campsite at Cottonwood Creek! grabbing some water and my camera I left a note where I had gone in the Rover, stating when and where I was and then set off down the trail.
It was rocky to begin with and got worse with larger rocks and being off camber with a 200' drop on the left side.
I stopped about halfway down where the road was only about as wide as my tire tracks, but now the off camber was maybe 20-30°'s. Nothing I wanted to try fully loaded and alone. The only tracks on it were from a side by side and they were old. I felt going down, with the off camber exception, was doable, but going up would be harder.
I hiked back up after taking pictures of the cottonwood stand and great views.
Now I know that the water in the road at Cottonwood Creek is not the end of the road!
But I had to turn around and go back to FS420 at Peavine Canyon, it is about a 45 min drive, I did most of it in 2Hi, really pretty country.
I took 420 to Fremont Route and went south looking for an unnamed(on my map) road. I was doing good, but with all the unsigned roads I took a wrong turn and wound up going North when I passed a florescent red painted pile of rocks I had passed 2 days prior coming from the opposite direction. At least I knew where I was.
From there it was a known route down Rd 21 to intersect with SSR88. Typically I left by this route and went NW on 88 to the left turn on a trail through the Cedar Mountains, following it along will bring me to Mina, NV and Hwy 95.
This time in the spirit of adventure I wanted to do something different so instead of going right on 88 I went left, looking for a crossover route through the Royston Hills.
Finding the turn off at around 1115 I headed into new territory. Map firmly in hand I made it over the Royston's and into a mess of roads. So I did what any good American Explorer would do, I lost the right track............
Just one more intersection and I'd have been OK. As it was I just followed this bumpy trail across the Western(I thought) side of the Cirac Valley and into some hills where I was sure I'd pick up the road I've crossed on before. It was noon
Little did I know how far off I was, looking back now at maps and GoooooooogleEarth I can see it, I was way off and still do not know exactly where I went. At the end of this bumpy trail I came down out of these hills to a wider road, but not the one I knew and there was a dry lake to my left not on my map. Where was I? It was 1330
None of the roads I could see lined up with my maps. I started to go south, but the road turned East into the hills, I turned around.
I tried following the road to my North and stopped a a ranch gate. I used my gps to scroll ahead looking for landmarks and found an identifying intersection about 2 miles ahead that was also on my map. I however wanted to find the way through on the track I had originally planned and was now convinced I had regained. Again I turned around...
Now when I got back to my starting point I followed the track towards the dry lake, the one not on my map, but the road was on my gps. It was quite a ways and took about 45min in 4hi-2nd thru sometimes soft soil.
When I got to the playa there was 2 stakes marking the entrance. Yay!
I went out and there were tire tracks going left and right across the surface and 1 set going across, following the ones going my way seemed prudent until they vanished. I pressed on looking for the other sides exit. I did find 1 stake but found nothing like a road....
Again I turned back, I was on the last 1/4 tank of fuel in my stock tank. Finding my entrance point I went back over the deep soft grey soil, at 1 point the track bifurcated and I took the left side for a couple of reasons; 1) I had come down the right side, 2) the left would take me further up the road I was trying to regain.
At one point I really bogged down and went into 4Hi but it wasn't the best option. I slung it into Lo box took off in second and worked my way up to 4th and fought my way along for half a mile or more. No wonder there were no tire tracks on this section! I switched fuel tanks once on the road and drove again to the ranchers gate and passed through. I had a bagel for lunch. It was 1430
Taking the road to the distinct intersection I followed it on the maps and worked my way to the main road and along to the road to Mina.
I was happy to be out, happy to be having an adventure!
Unlocking the MAP hubs just before getting on Hwy 95 I drove to the rest area in Luning. There I checked what fluids levels I could and washed my face. That done it was back on 95 and to Hawthorne. Ravi was working the Sinclair and recognized me, the price had not gone up still $3.499 for diesel.
A quick stop for another burger at Mickeys and some much needed coffee. It was 1600
I pressed for home knowing I could stop someplace if I need some sleep at a lot of places, but also knowing I would be home before 0300 like the last time. Going over NV Hwy 359 put the setting Orb of Zot in my eyes so I took a break at Anchorite Pass.
About 20 minutes was all it took, then ZOOM I was off again. (can a 109 go zoom?)
Soon into California and on Hwy 395 chugging up the 8000' summit north of Mono Lake towards Bridgeport.
It got dark and I turned on my Sylvania LED headlamps and kept going to the intersection with Hwy 108 and upwards and onwards in the cold dark. It was an uneventful climb I got to the pass around 2045
All downhill from there(yeah right..) I stopped again in Oakdale for another burger and more coffee then made the dash for home.
Though still a long way, 112 miles about 2-3/4 hours, the 200 performed admirably eating up the miles across California thru Manteca, Tracy, over the Altamont Pass, dropping into Fremont and across the flats of the South Bay now occupied by San Jose and the last climb up into the Santa Cruz Mountains into Boulder Creek. It was 0015
I took a shower and went to bed.
Some trip facts;
GPS has it as 334 miles from home to Hawthorne while my trip meter had me at 336.5. It's all uphill from here, I used 16.155g going there and 13.4g on the homeward journey with 20.67mpg going and 23.88mpg returning
In between I did around 269 miles and only switched tanks heading to Mina for an avg of 17.89mi/gal, I did do some longer idling and some low range 4x4.
Not one time was I flashed for my LED headlights.
I spent $154.64 on diesel, $65 on food and $30 on campground fees.
Looking back, I have looked repeatedly at my atlas and gooooooooooogleearth at the Royston Hills section. I don't think I was that far off after all. When I hit the playa I should have gone right towards Dunlap Mills and I would have been on the road I I veered off of.