Wednesday, February 24, 2016

Land Rover 109 longer test drive

I took a longer test drive the other day to check out my engine temperature management. I drove up a longish hill at around 35mph from 600ft up to 2500ft of elevation over 10 miles. The 109 ran fine I am happy to report.

On the flat driving to the hill the temp needle stayed around the middle of the gauge. I know from the past that the electric fan does not come on in this range. On the flat I hit speeds of 45-50mph. Once going up the hill the needle climbed to just below the red and at one point I saw it slightly in the red. This is about 200F.  IIRC the fan comes on at 210F and off at 160F.


Below are some pics I took in and around Big Basin State Park http://www.parks.ca.gov/?page_id=540 on the test drive.


Tuesday, February 16, 2016

Land Rover 109 coolant leak

Hmmm, I was going to go camping, not far away just to see how things go. I went and was checking fluid levels and found the coolant at the top of the inner tubes of the radiator. It had been filled to within 1/2" of the bottom of the fill hole.
     Looking around I found a puddle of coolant on the bottom of the fins on the right hand side, where the rust is in the pic.


    I called and talked to my friend Mike who owns an Andy's Auto Supply to get the real info on stop leak stuff. He recommended K-seal and I topped up the radiator and hopped in the 109 and drove down and bought some. When I returned home I checked the leak and it wasn't there? WTF?
    Leaks don't just stop... I waited for it to cool down and checked the fluid level, no change. Curious and curiouser.

    Next morning I got up and checked it fully expecting to find a puddle. Nothing! This was going to take some investigating. I started to look around closely and discovered that the tube extending from the overflow bottle had cracked and when the radiator cap opened the pressurized liquid would spray out on to the side of the radiator and pool on the lower tank.


   I fixed it by taking off the overflow tube and making a replacement out of aluminum tubing I had. I sealed it with silicon and the tank is sandwiched between washers and nuts on both sides. Then using my wood burning tool I melted the extra tube around the inlet nipple to close the break and hopefully strengthen the joint.


After my grocery trip today there is a little drip on the inlet nipple I will try a jubilee clip and see if that stops it. I didn't see any coolant anywhere else. Fingers crossed!


Sunday, February 14, 2016

Land Rover 109 another oil leak....!!!!

   I have been trying to go camping this weekend but the last 2 days as I was checking out the 109 to go I found leaks.

First I was low on coolant so I looked around and found a small puddle on the lower tank. So I drove int town and bought some K-seal figuring on putting it in last night when things cooled down. When I got home there was no evidence of a coolant leak. This morning either!?

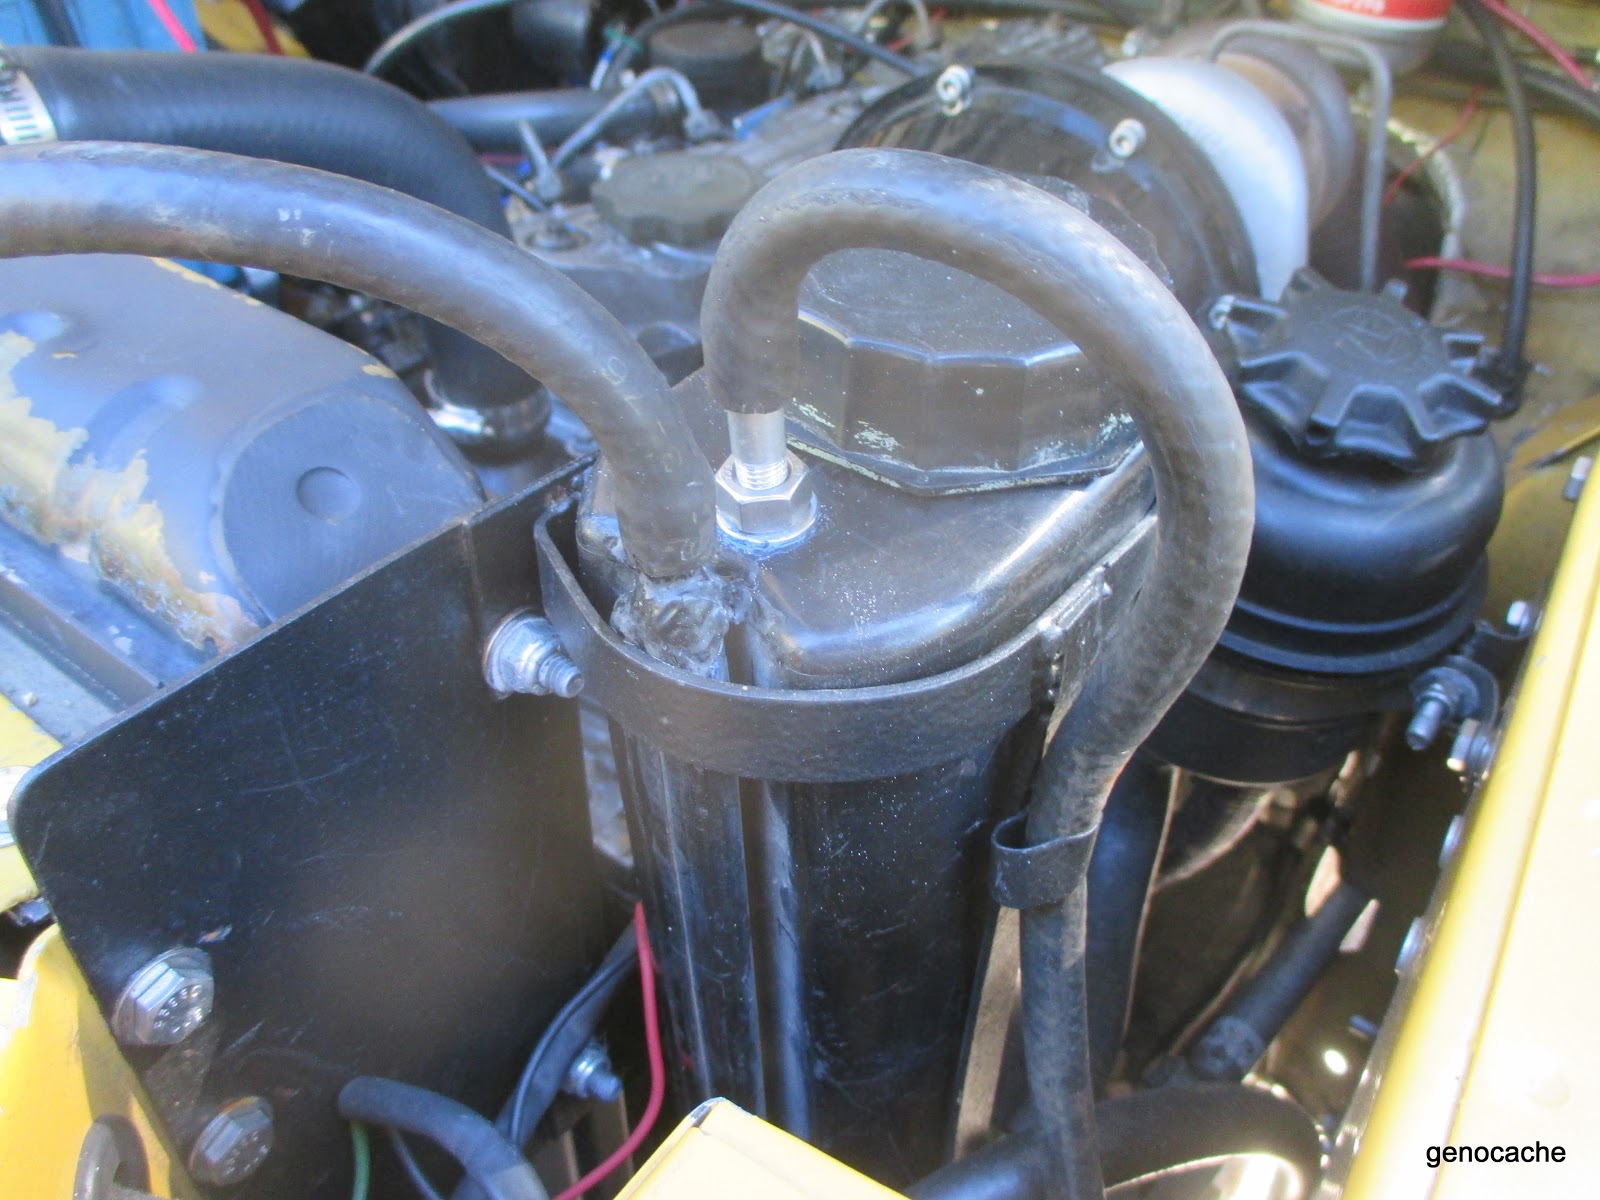
   Upon looking around I saw oil on the underside of the engine and investigating more I discovered I was about a half gallon low. Then I found the oil on the turbo return pipe/hose.


This is one of the toughest jobs on my Rover the space is so tight and it takes a 1" spanner to undo the bottom fitting. Getting dirty I got in there and pulled the leaking bastard apart. What I found was partly my fault. When the shop pulled the engine from the Disco they just cut lines and hoses to do it quickly. Here they cut  thru the braided stainless steel hose on the return line.
    I cut the braided bit off with my dremel and used the fitting for the 200 and hose to go to the fitting under the turbo for the 2.5DT. Are ya still with me?
    When I cut the SS off I made a groove in the fitting and figured(wrongly) that it would seal with a hose clamp.


I guess it didn't....

Looking around through my spares I found a replacement hose section. ERR3492. So I proceeded to check thread and sizes and make sure the length was good. Satisfied I installed it starting at the bottom to support it's weight while I threaded the top fitting on. It wouldn't go on though...WTF?  I tried for and hour wiggling the pipe this way and that, pulling the old one over and rechecking  diameters. Then I stopped for lunch. Going back out I worked on it for I don't know how long, at least another hour. Nothing would make it thread on, I couldn't even get it to cross thread.
    So I took it off and tried the old one, it went right on. This needed closer inspection, I cleaned the spare threads with a file and retried it, still wouldn't fit. something had to be different!  Side by side I looked at them and noticed the spare has the threads starting lower on the fitting whereas the original has thread all the way up.

Spare on the right.


Now I had to make the original work. So I put my palm sander in my vise and proceeded to sand off the grooves on the old fitting


Once that was done I loosely assembled the combo. Below is a pic of both assemblies;


Then installed the new and improved original and fired up the engine and checked for leaks.

bottom


top


No leaks at idle so cross your fingers.


Looking at the parts books I see that the 19j engine has what I have currently fitted, ie a pipe/hose/adapter while the 200 has the above mentioned 1-piece pipe. The part numbers for the 19j stuff are;

upper pipe   ETC 7654 and ERR3494
Adapter       ETC 6640  and ERR335

The ETC numbers are early engines and the ERR's are later ones.

Update;   I drove it about 30 miles today and no leaks. Oil or coolant!

Saturday, February 13, 2016

Land Rover Tex Magna canceling dohickey

    Some time between the trafficators time period and the Tex Magna indicator period there was a time when indicators were controlled by a switch on the dash. With the introduction of mandatory indicators the steering wheels had to be redesigned as to make for a self canceling switch.
    My 109 came with the dash style vacuum switch. However I much prefer the Tex Magna style and my old switch was caput. Alas and alack I do not have the correct steering wheel for the canceling device.
    I figured I could make one like the factory ones(a cup shape) and I had done so for my 88, Ignotus. Lying in bed one night I saw in my minds eye that I could make one the next day with materials at hand. I was tired of turning off the indicator some half block after my turn and going through the gears.

   Then BLAMMO!   I saw that I could make something different and easier to put on. So follow my pics;

First I got out my spare banjo wheel for a template.


After some measuring I found I needed a 2" square piece of 1/8" steel, in this I drilled a 9/16" hole since this is my largest bit, I had to use my dremel tool to enlarge the hole to 7/8".


here's how it looked on the wheel;


Then I needed a bit of 2" tubing, I searched high and low and finally cut a bit out of some exhaust down pipe for a 200tdi Discovery which I got with my engine. I cut a 2" long piece and cleaned it up. Here's how I set it up;


    Next I set about making some ears to weld to the plate and have the wheel clamp bolt go through. These took a LOT of work to make and fit as I did not have any material the right width, plus there had to be a right and a left...


Once those were ready I bolted it and clamped it all together and tack welded it in place.


For some reason I spent a long time doing finishing work on the welds and the circumference as to not have it look 'cobby"

Then it got primered and painted.


    Of course when I went to put it on it didn't fit my wheel............ I cut 1/2" off the length and had to do some trimming to the ears and to the steering wheel hub to make flat matching surfaces. In the pics you can see where material was removed.


Now it is night time and the paint is once again drying. It should all go together in the morning. It will take a 2.5" x 5/16" bolt to replace the 2" x 5/16" one. Pic to follow!

   Well it didn't turn out as easy as I thought. I had to loosen the lower inner steering column clamp and pull about a quarter of an inch up so the bolt would go through the groove in the inner column and match up to the holes in the steering wheel.

And here's how it looks;


I drove it last night and it works!

Wednesday, February 10, 2016

still chasing the Land Rover oil leak w/Update!

I cleaned up the cyclone separator trying to see if I could put another oring on the outside of the tube. But as you can see in the first picture there is no backing surface for an oring. That and the inside of the valve cover appears to be tapered at the entrance.


With a LOT of drilling and sanding I made a backing plate for some silicon goop. I used a thin piece of aluminum and cut out a 2 x 1-1/2" piece and measured and cut the appropriate pilot holes and finally used my Dremel to finish the larger 7/8" hole.


Then with some blue goop on it(Permatex) using the 8mm bolt it was affixed to the valve cover and left to set overnight.


Then today I made a short run and looked at the results.


Seems way better but something is still leaking so I started to chase it down or up in this case. I found a ring of diesel atop the #3 injector which I then tightened. After the engine cooled I cleaned it all up again and will take another test drive tomorrow. Whether or not the leak from the injector could get over to the valve cover I'm suspicious of. So methinks it is a valve cover gasket still seeping. Won't know until the last leak stops, right?

Also today I flipped the fuel cap locks around as I felt they stuck out too far and were too vulnerable.  In the LH side I actually had to grind down the edges of the hinge to get it to fit.


UPDATE; Feb. 13, 2016  It looks like I got the  oil leaks solved. The last one was indeed the fuel spill rail bolt not being tight enough. after a test drive I found that the #4 cylinder leak also was fuel from the spill rail bolt.

Friday, February 5, 2016

Land Rover cyclone oil leak

After some driving around and searching for the cause of my oil leak I looked at the o-ring on the cyclone separator coming off the valve cover. When I went to remove it it broke. It was rock hard. I changed my clothes and took my motorcycle down to The Hose Shop and bought a replacement. After installing the o-ring and then the separator. I ran the engine for about 15 min giving it some sustained rpm's a couple of times.

   Also done was I tightened the stud for the injector clamp on #1 even though it didn't seem loose.

Here are some before pics of the leaks;

#1 cylinder area

above the separator looking at the valve cover gasket


At the top of #3 cylinder


and lastly the bottom of #3 cylinder area


Even after doing all this and no leak in the driveway I am still not convinced that the valve cover gasket is not leaking. So I have to go for a drive and see. I can't abide to be having oil leaking out like that all the time. I couldn't reliably take it any long trip distances fearing my oil would disappear before I could find more.

O poop! I just drove it into town and back and it appears that the O-ring isn't keeping all the oil in, however it is less than before. DRAT! On the good side the #1 and 3 cylinder stuff appears to have dried up!

Wednesday, February 3, 2016

Land Rover 109 gets LED indicators

   My indicators weren't working quite right due to the small LED indicators I put in the dash. The light would come on when selected but not really go out between cycles just dim and brighten. That worked but I wanted some definition so peoples wouldn't be mistaken about my turning intent.

   The cure would be either take out my small dash LED's or convert to LED's all around. So thanks to some investigation and posting up on the Guns and Rovers forum by Stomper all the part numbers were readily available.

    I purchased for around $75.00 from Superbrightleds.com  4 amber 180degree #1156-A18-T lites and 1 flasher # FL3-RED-K, 3 pin Red American Flasher.


   So just pull open the dash and pull the old flasher and swap wires and install the new flasher.


Here's a look at the different bulbs;


   Then just walk around the 109 and replace the lites. Do they call the LED's bulbs? There is no glass.


Check for operation, I had to check my ground in the dash to get things to work.


TA-DA!