I decided that while I was sourcing a Defender intake/exhaust/turbo for my Disco motor that I would make a fan shroud for the 19J motor. Thanks to Brett G. I realized that I could do it as I thought that the radiator had no mounting holes predrilled in it. My old eyes just couldn't see em...........but Brett could.
Starting with some aluminum sheet I had I made measurements and laid out the size and put some bends in the body of the shroud. Next the body was temp mounted by the 2 top screws and a circle was drawn using the fan blade for the centering device. Then the circle cut out.
You can see that I couldn't just mount a stock shroud as my engine is offset for some reason.
It took quite a bit of mounting, checking for fit, dismounting and pounding with a hammer to get the bend on the bottom to fit the bottom hose. Once the body was set with the hole I measured the side holes and drilled them for the mounting on 4" centers as indicated by the exhaust side of the radiator. This also fit with the drill pattern of the old radiator in my shed.
A cowl was made to enclose the fan itself and clamped in place and marker holes drilled and then I put in 1/4-20 rivenuts to hold the cowl. again the body was temp fitted and the cowl fit checked, bummer, I had made it too long and had to trim the ends shorter to clear the alternator and the bottom hose.
How it looked on the body;
Once the cowl fit and the body ready the fun really started..............the holes on the battery side were not on 4' centers and due to my hammering on the bottom hose area the body had spread and the sides did not line up any longer. It took many fittings to square everything up and then find the holes were not correct. *^$#@$#@!
Those holes were measured and redrilled and in some cases Dremeled out oval. Now those screws are damn small, #6's, and my hands and forearms fat and if you have ever worked in there it is not condusive to tools either. But I got it on! Only to have to take it off again to make a top cover piece. The top cover has to have a relief in it to allow for the top hose. You can see it in the last pics. So it was cut and the top made and fitted and then reinstalled and the holes for the rivenuts predrilled then removed and the rivenuts installed and all was put back together and the fit checked for interferance.
Once it was all OK I put on the top hose and fired it up. No weird noises and no leaks!!!
All this work took me 2 days, about 5 hours just to make the body, I have no metal brake so I clamp everything to my welding table and bend it with a deadblow hammer, Using a jigsaw the shapes are cut out. It took about 6 hours to fettle the cowl and top piece and get the darn screw holes right, lots of bending over with my head under the bonnet.
By now you might be asking yourself if it was worth it, I was, but I was too tired to take it for a drive. So what else could I do......I had a late lunch and took a nap! :^)
Later I did take it for a quick drive, One of the roads around here climbs 2000ft in 3 miles, on the drive over to it the temp guage seemed a little cooler. I couldn't tell for sure as it's one of those numberless guages. The last time I test drove this hill it was 20F hotter outside, the temp guage seemed to get up to the red later but by the time I reached the top the needle was over halfway into the red.
I have a small infrared thermometer, I don't know how accurate it is but it should be relative to itself, using it the head by the temp sender was 258F the top hose was 195 and the bottom hose 165, the oil cooler hoses showed a delta T of 45F. Once home the head showed a 180F and the top hose @150 and the bottom 125. I don't remember the oil cooler temps. I have a 180F thermostat.
Now if I can only find those Defender bits........cheap.
Hey, Paul does this help with your fix? ;^)
Thursday, October 16, 2014
Off Road lites and simple roof rack
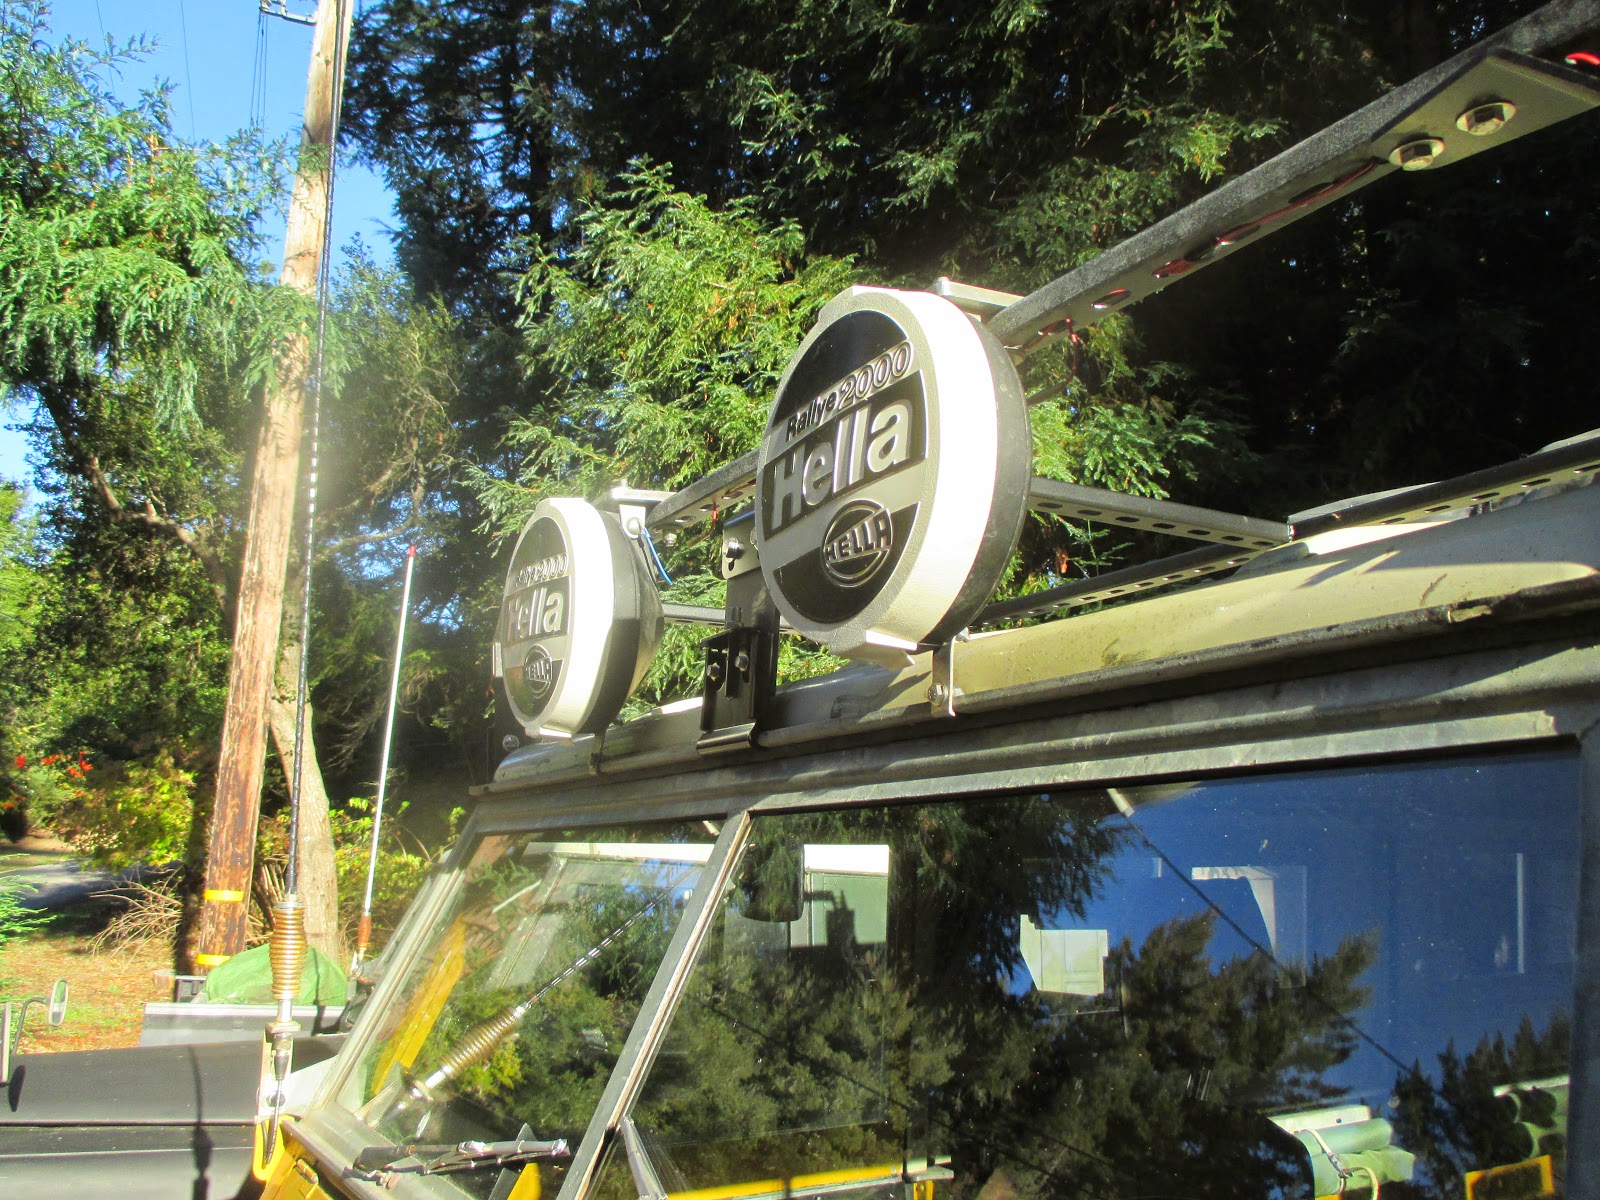
Well a while ago in 2010 I bought some used off road lites, namely some Hella 2000's. When I ordered my wiring harness I ordered a circuit with a fused relay for roof top lites. I finally got around to deciding that I could put them on since I have the RTT.
To do this I just moved one of the unused roof racks forward and after some experimentation I found a place and decided on a type of mount that I will see if I like enough to paint and keep. It all vibrates a bit when jiggled so I don't know....I've just used some superstrut and bolted it all together. I might weld it all up if I like it. I used the Gamiviti rack clamps; http://gamiviti.com/html/products_roofracks.html
So on to the pics( I know you are dying to see..............)
So after driving with the lites so fitted it was found that they are too loose and the housing vibrated back and onto the roof. As I thought this was going to happen I was ready with a plan!
I made a roof rack to help with the vibration and although not quite finished (still to add plywood) it really stiffened up the front crossbar. It was made again with Superstrut cut and welded to make the roughly square 4x5 shape.
I then reengineered the lite mounts by using some 1/4 x 2" aluminum bar stock I had and made some flat, less tall mounts. The allen bolts I originally used for theft prevention were already rusting so I went with 3/8-24 2" stainless bolts and grade 5 nylock nuts. Whilst this quieted the vibration a lot I still had enough to worry about the light beam getting out of alignment. The Hellas came with some braces but I didn't get them from the PO, so I made my own. There is a local guy who buys and sell machine shop tools and he has scrap metal, from him I bought a piece of 13ga SS 5x12". I cut out 2-5"strips.
center punched them
drilled pilot holes
and the final 1/4" holes
at the same time bending and fitting as I went. These were bolted into the lite housing using the supplied holes;
The lites were re-installed and using a thick washer on the back side of the brace clamped to the rain gutter. I also added a roof rack mount to the center of the roof and the rack, I can walk on the rack with confidence that I won't bend anything on the lites.
With that the vibration ended and now it is solid!
You can see from the pics I need to get some flood lites next time, these spots allegedly reach out 750meters.
Headlights only;
Spots before all brackets were on.
So I have been asked for more detail.
Here is a picture of the top mount and how the lite bracket is bolted to it and it to the roof rack, you can see I've run the wiring inside the SuperStrut.
I split the wire in the strut for both lites and only ran a single wire from the relay.
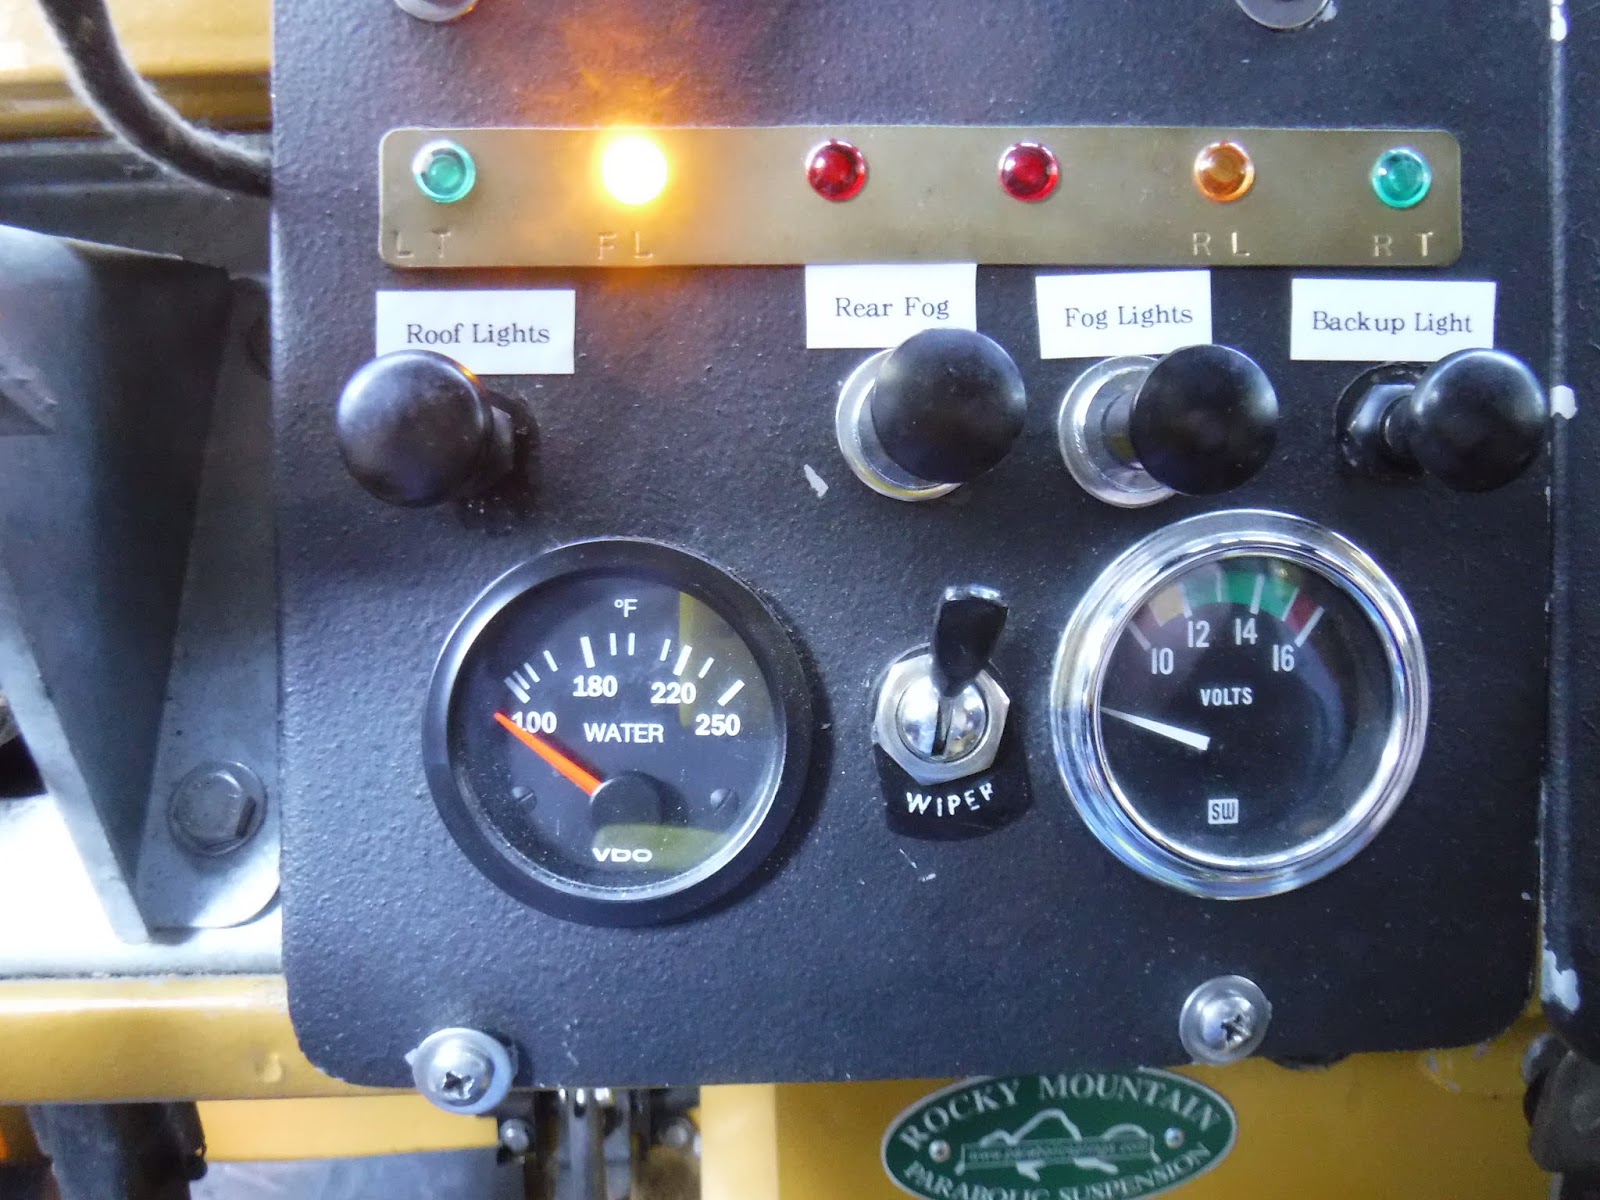
I brought this wire back through the bulkhead and along the parcel tray where I tapped in for the idiot light. Here is the panel with the light switch on the left and the yellow idiot LED on.
The back of the panel looks like this( I like my wiring long so I can get in and do work):
From the relay the wire comes out the side of the parcel tray where it runs up next to the windscreen.
From there I ran it under the door seal and in the junction of the roof windscreen. Here you see it as the dark red wire.
On the outside I just ran it on the roof rack mount and tried to keep it from possibly getting snagged on branches with wire ties.
Then just along the inside of the rack where it splits for the 2 lites.
Ground is through the light case and the mounts.
To do this I just moved one of the unused roof racks forward and after some experimentation I found a place and decided on a type of mount that I will see if I like enough to paint and keep. It all vibrates a bit when jiggled so I don't know....I've just used some superstrut and bolted it all together. I might weld it all up if I like it. I used the Gamiviti rack clamps; http://gamiviti.com/html/products_roofracks.html
So on to the pics( I know you are dying to see..............)
So after driving with the lites so fitted it was found that they are too loose and the housing vibrated back and onto the roof. As I thought this was going to happen I was ready with a plan!
I made a roof rack to help with the vibration and although not quite finished (still to add plywood) it really stiffened up the front crossbar. It was made again with Superstrut cut and welded to make the roughly square 4x5 shape.
I then reengineered the lite mounts by using some 1/4 x 2" aluminum bar stock I had and made some flat, less tall mounts. The allen bolts I originally used for theft prevention were already rusting so I went with 3/8-24 2" stainless bolts and grade 5 nylock nuts. Whilst this quieted the vibration a lot I still had enough to worry about the light beam getting out of alignment. The Hellas came with some braces but I didn't get them from the PO, so I made my own. There is a local guy who buys and sell machine shop tools and he has scrap metal, from him I bought a piece of 13ga SS 5x12". I cut out 2-5"strips.
center punched them
drilled pilot holes
and the final 1/4" holes
at the same time bending and fitting as I went. These were bolted into the lite housing using the supplied holes;
The lites were re-installed and using a thick washer on the back side of the brace clamped to the rain gutter. I also added a roof rack mount to the center of the roof and the rack, I can walk on the rack with confidence that I won't bend anything on the lites.
With that the vibration ended and now it is solid!
You can see from the pics I need to get some flood lites next time, these spots allegedly reach out 750meters.
Headlights only;
Spots before all brackets were on.
So I have been asked for more detail.
Here is a picture of the top mount and how the lite bracket is bolted to it and it to the roof rack, you can see I've run the wiring inside the SuperStrut.
I brought this wire back through the bulkhead and along the parcel tray where I tapped in for the idiot light. Here is the panel with the light switch on the left and the yellow idiot LED on.
The back of the panel looks like this( I like my wiring long so I can get in and do work):
From the relay the wire comes out the side of the parcel tray where it runs up next to the windscreen.
From there I ran it under the door seal and in the junction of the roof windscreen. Here you see it as the dark red wire.
On the outside I just ran it on the roof rack mount and tried to keep it from possibly getting snagged on branches with wire ties.
Then just along the inside of the rack where it splits for the 2 lites.
Ground is through the light case and the mounts.
Saturday, October 4, 2014
Land Rover, roof top tent
I have been thinking about sleeping on my roof for a bit as I think that I won't want to unload a ton of gear to sleep in the cot inside which I made. To that end I started on a design for a rtt using my spare 88 roof and making it into some sort of pop-up. In the end it was harder and more time consuming and costly than I thought it would be. Not as costly as a rtt but still unfinished I don't know the final cost.
I made the rack it sits on out of Super strut and clamps of the old Con-Ferr design from Gamiviti; http://gamiviti.com/html/products_roofracks.html
There is a local rtt supplier(Tepui tents) that I had been to visit before the Overland Expo in Arizona and I saw them again there. I just missed one of thier tents on Craiglist for $350USD used twice. But I kept scouring Craiglist and ebay for a deal. I even contacted manufactures in China thru Alibaba, a 3-4 person for $650USD+ shipping, they wouldn't tell me shipping costs unless I ordered one....Finally I stumbled on an ad by Tepui saying they were having a sale on thier demo models. I called em up and went down to see what I could find and decide if I wanted to spend that kind of money.
Griffin the sales guy showed me around and answered all my questions and made his recommendation. Biting the bullet an Autana model was purchased and put on the 109. www.Tepuitents.com
It looks like a comfortable fit for 2 and you could squeeze 4 in if you were all close good friends or quite short. I went home and opened it up and checked it out, haven't yet used it. I did discover it is alot more work to open and close than one would expect. My option was for it to open over my rear door and give shade over the cooking area. With the addition of an annex in the future there will be a contained space for upstairs and downstairs.
Crap, I deleted the pics and can't find them;
I made the rack it sits on out of Super strut and clamps of the old Con-Ferr design from Gamiviti; http://gamiviti.com/html/products_roofracks.html
There is a local rtt supplier(Tepui tents) that I had been to visit before the Overland Expo in Arizona and I saw them again there. I just missed one of thier tents on Craiglist for $350USD used twice. But I kept scouring Craiglist and ebay for a deal. I even contacted manufactures in China thru Alibaba, a 3-4 person for $650USD+ shipping, they wouldn't tell me shipping costs unless I ordered one....Finally I stumbled on an ad by Tepui saying they were having a sale on thier demo models. I called em up and went down to see what I could find and decide if I wanted to spend that kind of money.
Griffin the sales guy showed me around and answered all my questions and made his recommendation. Biting the bullet an Autana model was purchased and put on the 109. www.Tepuitents.com
It looks like a comfortable fit for 2 and you could squeeze 4 in if you were all close good friends or quite short. I went home and opened it up and checked it out, haven't yet used it. I did discover it is alot more work to open and close than one would expect. My option was for it to open over my rear door and give shade over the cooking area. With the addition of an annex in the future there will be a contained space for upstairs and downstairs.
Crap, I deleted the pics and can't find them;
Land Rover 200tdi for the 109
I gave up on the 19j motor overheating issues and found a used 200tdi out of a Discovery, the guy brought it over from the UK in 09 thinking he would put it in his 109 pu but went instead with a 2.25P that came his way.
It looks good on the outside and came with a timing belt kit which I will do so I can start from zero when I get it going. The next few weeks will be busy.
Saturday, September 20, 2014
Curtains for the Land Rover
Well, in my attempt to take my 109 to the Overland Expo in May I had a need for some curtains. I wound up getting swimsuit material because it is stretchy and opaque. My color choice turned out to be camo. Because my sewing skills are not up to stretchy material I sourced out the actual construction to a local sewing place.
To make a long story short he didn't have them done on time and the one that was done was wrong. Eventually they were made correctly but the 109 didn't make it to Arizona.
My design was to just have bungee sewn inside the hem of the curtain and I could just stretch them over the side windows, much like a shower cap, I can even have the window open to get some air in.
Here's the inside of a finished side window curtain;
From the inside it looks like this on the window;
From the outside the side window looks like;
The front and back curtains are of different construction, they needed to have a pass through hem so I could then run a bungee in it and hook it to the inner raingutter. The front one is wider to reach full from side to side whist the rear only needs to cover the window in the door.
I had a duece of a time trying to figure out how to clamp the bungee to the raingutter. At first I tried making plain 90deg hooks and attaching them to the bungee. I couldn't get the hooks to stay on the gutter, but I did learn that I could ziptie the bungee to the hook when tying it didn't work. Next I made a more complicated hook which with a "W" shape it actually held onto the gutter but wasn't quite "right" for me. Then I hit on the idea of using a binder clamp and ziptying the bungee to one of the handles. Brilliant!
So with a bit of time and cutting and zipping I am satisfied, the curtain is taut, simples, and easy.
Here's the front from outside;
And from the inside;
The rear from the outside;
With the door open;
From the inside;
How the bungee's are attached;
To make a long story short he didn't have them done on time and the one that was done was wrong. Eventually they were made correctly but the 109 didn't make it to Arizona.
My design was to just have bungee sewn inside the hem of the curtain and I could just stretch them over the side windows, much like a shower cap, I can even have the window open to get some air in.
Here's the inside of a finished side window curtain;
From the inside it looks like this on the window;
From the outside the side window looks like;
The front and back curtains are of different construction, they needed to have a pass through hem so I could then run a bungee in it and hook it to the inner raingutter. The front one is wider to reach full from side to side whist the rear only needs to cover the window in the door.
I had a duece of a time trying to figure out how to clamp the bungee to the raingutter. At first I tried making plain 90deg hooks and attaching them to the bungee. I couldn't get the hooks to stay on the gutter, but I did learn that I could ziptie the bungee to the hook when tying it didn't work. Next I made a more complicated hook which with a "W" shape it actually held onto the gutter but wasn't quite "right" for me. Then I hit on the idea of using a binder clamp and ziptying the bungee to one of the handles. Brilliant!
So with a bit of time and cutting and zipping I am satisfied, the curtain is taut, simples, and easy.
Here's the front from outside;
And from the inside;
The rear from the outside;
With the door open;
From the inside;
How the bungee's are attached;
Sunday, September 14, 2014
Kite surfers
Last week my friend Brett G. and I drove my 109 up to Half Moon Bay to see our friend Brian H. We drove up Hwy 1 from Santa Cruz, and stopped at the Pigeon Point Lighthouse where I took a couple of pics.
After the visit on the way back we stopped at Waddell Beach and watched the kite and wind surfers, there was also a few hang gliders in the air too. The kites and such don't show up in the pics too well, but there was about 30 of them. In the last pic the point of land going out into the Pacific is Ano Neuevo, once home to a lighthouse and now an Elephant Seal preserve. The chalk cliff to the right of the 109 is called Big Slide, In the late 1800's, early 1900's a railroad was put thru here and at low tide you can somtimes see the old pilings sticking up thru the sand. The railroad effort was in the end fruitless because Big Slide kept doing it's thing and wiping out the tracks.
So it inspired me and I wrote this poem;
After the visit on the way back we stopped at Waddell Beach and watched the kite and wind surfers, there was also a few hang gliders in the air too. The kites and such don't show up in the pics too well, but there was about 30 of them. In the last pic the point of land going out into the Pacific is Ano Neuevo, once home to a lighthouse and now an Elephant Seal preserve. The chalk cliff to the right of the 109 is called Big Slide, In the late 1800's, early 1900's a railroad was put thru here and at low tide you can somtimes see the old pilings sticking up thru the sand. The railroad effort was in the end fruitless because Big Slide kept doing it's thing and wiping out the tracks.
So it inspired me and I wrote this poem;
A
burning sun slips into a golden molten pool on the far side of a wild, blue,
Pacific sea.
As the skittish evening Northwest breeze pushes a silent wall of gray fog closer, ever closer to me.
A wall which hems in and frames the multitude of colourful kites sailing to and fro.
Like swarming insects above the poikilothermous creatures below.
As the skittish evening Northwest breeze pushes a silent wall of gray fog closer, ever closer to me.
A wall which hems in and frames the multitude of colourful kites sailing to and fro.
Like swarming insects above the poikilothermous creatures below.
To
fly, be free, upon the water these graceful peoples be.
With taut lines the sails pull black suited humans quickly.
Carving out of Natures realm a space of temporary ecstasy.
Forgetting life's struggles of money, love and drudgery.
With taut lines the sails pull black suited humans quickly.
Carving out of Natures realm a space of temporary ecstasy.
Forgetting life's struggles of money, love and drudgery.
Quickly
cooling sand once warmed by the sun entreats the oceans breakers to rest from
their long journey.
Tall redwood trees beckon to the fog, one can almost hear them in voices raised by the wind.
"Come, Come water me"
Taller still the brown shale cliffs rise turning to gold in the light of days end.
Tall redwood trees beckon to the fog, one can almost hear them in voices raised by the wind.
"Come, Come water me"
Taller still the brown shale cliffs rise turning to gold in the light of days end.
Saturday, September 6, 2014
Compliments
Tuesday I was leaving a parking lot in Santa Cruz in my 109, as I sat waiting for a car in front to turn, this younger guy(late 20's-30's?) in a good looking old Scout 2 or a Blazer, pulled next to me and said "That's one seriously nice rig!" I said "Thanks".
It really feels nice to get the smiles and thumbs up most of the time I go out. I know 95% of it is the paint job my friend Brian laid down, but the other 5% was my vision and hard work!
Before;
After;
The Master taking a break;
Now if I can just get the motor sorted...... I think I am on the trail of a rebuilt 200tdi.
It really feels nice to get the smiles and thumbs up most of the time I go out. I know 95% of it is the paint job my friend Brian laid down, but the other 5% was my vision and hard work!
Before;
After;
The Master taking a break;
Now if I can just get the motor sorted...... I think I am on the trail of a rebuilt 200tdi.
Subscribe to:
Posts (Atom)