Sunday, August 25, 2013

Range Rover in Death Valley

     Last Thanksgiving I went to DeVa with my friends Linus and Brett. I really wanted to take my Range Rover, a 1993 long wheel base, as I had not taken it off road yet. So I convinced them that since we only had a few days due to work schedules that going in 1 faster vehicle would be better, plus we would share in the trip experience by being together.
    It was an uneventful drive down, we broke up the driving by switching with every tank of fuel. After dark found us on Hwy 14 in the Mohave where we pulled off on an exit and went a short distance into the desert. Here we spread out our ground tarps and slept.

     Bright and early we were up and at it again. Heading over to Ridgecrest where we picked up groceries and fuel. Then we headed thru Trona and into Panamint Valley on Hwy 178. Going straight over to Ballarat and Indian Ranch Road. Our objective being Jail Canyon in the Panamint Range to which none of us had been.
    Indian Ranch Road wasn't bad but the road into Jail Canyon ain't nice!! Definately high ground clearance but 4x4 not needed until into the canyon itself . There it is broken up by small washes here and there with some 2ft elevation differences.
     Linus was driving up the canyon and we came to a HUGE boulder in the middle of the wash fully 20' tall. The road passes next to it and drops into a wash the width of which is about the same as the rangie. We went into  and out of it with no problem! Around the bend the going got tuffer so I scouted ahead. In a short distance it was not feasable to go on considering we were only 1 vehicle. There wasn't room to turn around so Linus backed up across the wash and parked next to the HUGE boulder.
     We had to wait there as 3 J**ps were heading into the canyon. We watched as they struggled to get across the wash we had just backed thru. Admittedly it was poor line choice not the vehicles fault that they had trouble. After they went by Linus was able to turn around and we headed out. Did I say the boulder was HUGE?
     From Indian Ranch Rd. North to  Trona-Wildrose Canyon Rd took us up the side of the Panamints to the shoulder of Telescope Peak and there we looked at the charcoal kilns. Built in the late 1870's( no-one knows exactly) the kilns were built to make charcoal for the smelters for the Minnieta/Modoc/Defense Mine, located across Panamint Valley on Lookout Mountain.


Brett and Linus at the kilns.
 A short drive around Mahogony Flat Campground and looking at the views down into Death Valley saw us headed down Emigrant Canyon to secure a campsite at Emigrant Campground.
 
That evening we  were visited by a kit fox at night.

 
Up before light the next morning you can see in the pic above that we have broken camp and Linus and Brett are ready for a day hike. Thier objective is a 1952 plane crash of a military Albatross. Six people bailed out over DeVa and the plane crashed on Towne Peak. It is estimated to be a 5-7 mile hike one way cross country. Starting at Towne Pass(4,956') and over Towne Peak (7,287'). They started early due to the shorter days and to take advantage of the cooler mornings.
They are the 2 dots in the center of the pic.
 
I on the other hand planned on being a tourist due to my inability to do a long hike such as this(ankle injury). So I dropped the guys off in the growing light, then headed to Panamint Springs Resort.
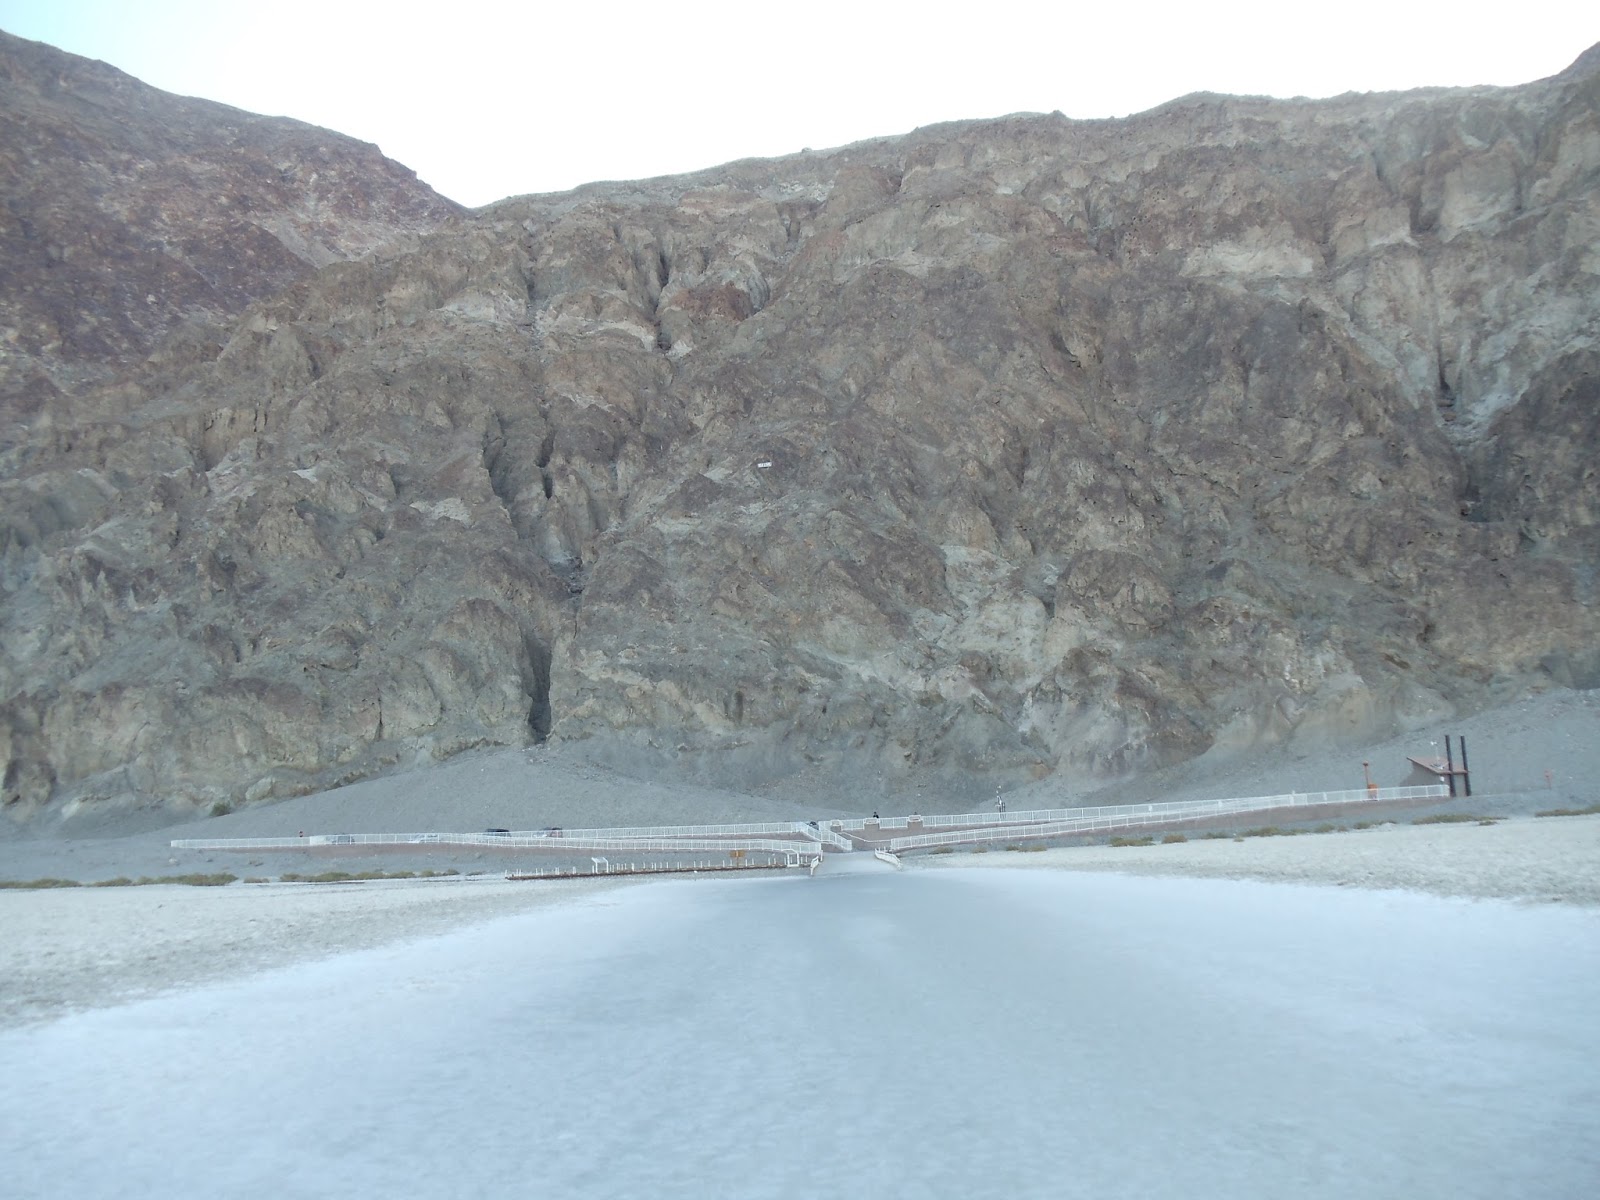
Once there I fueled up and headed over to Badwater, the lowest spot in North America. I was very early it being around 0800 by the time I arrived and the parking lot was MT but for 1 other car. So I took a stroll out onto the salt pan and looked around. Very stimulating in the chill of the morning and the complete sense of desolation and solitude. My gps showed -289'.

The above pics taken on Hwy 190.


Salt pan.
I took some pics of the sign for sea level it is on the cliff above the parking lot. It looks like a white line or a dot in the pics.


From there I went and visited the Devils golf course, which surprised me by how large the salt heaves/crystals grow! It is no wonder the early emigrants and miners avoided travel across this "flat"


     The cracks were knee high! Some of the holes were 4 inches across. Once I was finished stumbling around the golf course I got back in the rangie and went on the Artists drive.
     The road was surprising in that it followed the desert contour thru some of the abrupt washes. I wasn't so impressed with the Artists Palate, yes, the colors were there but seemed washed out and dull to me. Otherwise for me the landscape was the best! Something about the bare tortured hills and the vast brown vistas across Death Valley itself. And being able to look across it and see places where the 49'ers passed and being in awe of thier heroic saga some 160 years ago................then to recognize places I have been like Johnson Canyon and Trail Canyon. Knowing that DeVa has a greater elevation change than the Grand Canyon. From Telescope Peak at 11,049 to Badwater at -282 is 11,331 feet! Over 2 miles in about a 12 mile crow flight.

                               Looking across to Trail Canyon
                                             Artists palate
     After a trip to the visitors center I headed back to Towne Pass to pick up the guys. We figured they would be back around 3 but I wanted to get there early incase they finished sooner. I had a radio and so did they incase of an emergency but I had to be close to hear them. Good thing I got there early as soon after I had finished a beer and gotten bored they showed up! Below are some of the pics they took of the hike.


                                                   Linus

                                                      Brett


Last pic is looking down Dolomite Canyon into Panamint Valley and the Argus Range in the West and beyond them the Sierra Nevadas.

     Once were were collected the next adventure was to Saline Springs via South Pass Rd. Grapevine Canyon has been signed closed by the Inyo County for years but had some new weathering this last summer. We had to find out if it was passable. Going down Grapevine was indeed different than last year, instead of having 3 water crossings there were 11 washouts! Most of them had 2-4ft sides. The rangie made all of them hugging the sideslopes and dodging the boulders, it did drag the reciever in a couple of the sharp climbs out of the wash.


     The moon was up as we hit the valley floor with 30 miles of washboard road to go to get to the springs. It was dark when we got there and we soon found a campsite in the baseball field. Then it was off to the hot springs!!.........
     The next day was very nice sunny and warm in the light but if you were in the shadow the air was colder. Brett and Linus opted for another day hike over to the cinder cone to the East, with the peace sign on the side. While we were breaking camp some a**hat's dog ran over and peed on Linus's sleeping bag/pillow. Fortunately Linus had turned the ground tarp over it so it was partially protected. The dog owner just shrugged his shoulders, if he didn't see it nothing happened. We had words with him later at the springs, I was pissed at him for his attitude.
    So the guys headed off on the hike and I went over to the springs to do some reading. I think I was still working my way thru the Manly book. Sometime later Linus returned and we chatted on the lawn about his hike and plans for leaving on the morrow. Being a holiday the springs were busy, I wouldn't say crowded but due to the nice weather every one was out and not huddled around a fire at thier camp.
     After a bit a woman came to the lawn and asked if anyone wanted to play cribbage, dominos, or some other games she had brought. No one replied quickly so I figured I'd give cribbage a try as I hadn't played in years. So she came over and started setting up the board.
      I introduced myself and she responded that she was Fun Fun Debbie or Dr Fun Fun. As we played it came out that she has visted the springs for many years. I myself am a newcomer only having been there for the first time in 09.  As we played the first game she took off her dress and was sitting across from me naked. Surreally here I was, sitting in arguably the most remote part of the US, in a desert, on a grassy lawn, playing cribbage with a naked lady whom I had just met. Inconceivable!
     While I won the first 2 games as Linus watched and learned, other peoples started playing with Hula hoops and a game of Cornhole was set up. Fun Fun won the third game and wandered off to play Cornhole. Brett had come over and was trying the Hula hoops. After that he, Linus and I went back to camp.
     An evening spent in the hot springs and an early dip for Brett the next morning in the Sunrise pool saw us off headed for home up and over South pass again.


                                       Yes, that is the road!
                             Looking back down the side slope section.

     After fueling up in Olancha, Linus thought I was asleep in the back when he hit 109mph on Hwy 395. The rest of the trip home was uneventful.

     I'm not sure but I think that somewhere on this trip we bent the drag link on the steering. I found it by the extreme tyre wear on the front tyres. All in all it was a good trip!

Saturday, August 17, 2013

The hits just keep on happening!

     My son-in-law came over and while I turned the crank he looked at the camshaft. It is mostly good but #6 lobe has a bad mark on it so I'm going to have to replace it. I've ordered cam and bearings and end thrust plate, new microencapsulated bolts, tappet kits(include guide, roller, tappet), rocker arms. I need to get the timing pins for the injector pump and flywheel so those are also ordered. I previously ordered timing belt and tensioner so those will go on as well. All thru Trevor at Rovah Farm. http://rovahfarm.com/   I know I could have got them cheaper out of the UK but Trevor has been very helpful thruout the build. Thanks Trevor!  Everything will be here in about a week. So for now I sit and wait.
     I'd rather do this all now than someplace like Death Valley or Nebraska! It should run sweet after I'm finished!
     Here's a pic of the old tappet kits. I don't know if you can see but #4/6 guides are showing wear like #8 and you can see that those tappets also have 1 short leg due to wear. All the rollers are severely worn out of round with the exception of #3, it shows normal wear.


     Of course #8 on the far right is the one I drilled out, that is why it is in 2 pieces.

Tuesday, August 13, 2013

Land Rover tappet removal

     If I had hair I'd probably pulled it all out by now....

As the cam turns a steel roller rides on the lobe, the roller pushes the brass tappet up in the guide and the pushrod sits on the seat on top of the tappet. The pushrod is connected to the adjusting screw in the rocker arm. When the lobe goes up, the roller pushes the tappet-pushes the pushrod-pushes the adjuster screw all up. This forces the rocker arm to pivot and push the valve open.

    Anything wrong in the sequence and there is a loss of power and bad timing.

    I tried to get my brass tappet out by the usual method of pulling on it with a wire. Nothing moved. So I wound up drilling out the oil hole down thru the tappet body to the roller. I did it in careful stages with grease on the bit and pulled the bit out often to clean out the grease and swarf with Qtips. I went in 1 drill size increments and it took me 3 hours to drill out the body. When I broke thru one side of the body I used a greasy Dremel tool to cut thru the other side. Then using needle nose pliers I could pull out the tappet. The roller was then removed with a magnet.


     In the next pic you can see the remains of the brass tappet and the roller. Just remember that about 5/8's of an inch is missing from the center of the tappet. The roller should be round..........

    Next up was to remove the guide. If it was free it should have come out when I pulled on the tappet with the wire. A look with the borescope showed the slide part had been hammered by the roller/tappet and probably stuck to the cylinder wall. The book says to remove stuck guides with an extractor tool but I couldn't find any online, just pdf files saying to use one....

    I resorted to going to Andy's Auto Supply and renting a slide hammer that would do the job. But first I had to make an end for the puller. I used a 1/2x 3/16x 1 3/8 flat stock with a 1/4-20 hole in the middle. The slide hammer has a 1/4-20 threaded bit on the end.
 
 
You can see the damage to the #8 guide as compared to the #7 one. Will be replacing all the guides, rollers and tappets. Need to look closely at the cam when all the guides are out. Then clean out the engine and drop the oil pan and clean it out and change the oil filter. Then change the oil/filter again after a short run about.

Tuesday, August 6, 2013

Land Rover valve adjustment

     After driving the 109 a bit once the brake was fixed I figured out that the valves needed adjustment. Lots of noise and a thump..thump kinda noise coming from the air intake.
     I went to do the adjustment and found that I couldn't turn the crankshaft and watch the rocker arms at the same time to see which valve was open. I needed either a 41mm or a 1 5/8" socket to fit the bolt on the front pully. I looked locally and no one had one in 1/2" drive(or 3/4 for that matter) but they could order one.
     I went onliue and got one(1 5/8) off Amazon. Took 3 days to get here but only cost $18 with shipping.
     So today I adjusted the valves. As you are probably aware nothing goes easy with this car!
     Case in point was the inability to see the tappets move. My solution was to grind down the end of a handcrank into a square 1/2" drive. This inserted in the socket and supported by a bungee at the bumper allowed me to do the job. It isn't easy like the same system on the 2.25 but it worked!
     I started with book in hand at #8 valve fully open and adjusted #1 tappet and then moved thru the list. When I got to setting #8 tappet with #1 valve fully open is when the fun started.
     There was a HUGE gap from the rocker arm to the valve stem. I measured it with my feeler guages===fully a quarter of an inch! What was supposed to be .008 was actually .250!! WTF??

     As I went to adjust the tappet I found the thread on the adjuster buggered up and not allowing the adjuster to move down enough to make the proper adjustment. So after some fumbling around I took off the locknut and tried to screw the adjuster out. Then I had to pry the tappet over and pull out the pushrod. Well, the adjuster wouldn't screw out due to the threads. I had hoped that removing the nut would have "fixed" them. So then I took the nut and found the thread size(metric 8x1.25). I then took my die and with a rag under it I ran it down the adjuster threads. It then came out easily!
     I tried to match it to some 2.25 petrol bits I have but the pushrods are longer and the adjuster was SAE. The adjuster was the same size though. So it had to go back in. I put it on with out the locknut on just to have somewhere to start.
     Starting over at #8 open and adjusting #1 I went thru the order. Numbers 4 and 6 also had about 1/8" gaps. All the locknuts were tight nothing had slipped even on #8. When I got back around to doing #8 tappet it was loose and as I tightened down the adjuster I began to run out of thread! ???
     Soooo, I went thru the whole adjustment schedule again. I had to replace the locknut on #7 because I couldn't get a spanner on it to begin with. This is what I ended up with on the adjuster screw.
    
I thought it was good now so I put on the valve cover and hooked up the breather. I tried to start it but it was no go.  Glow plugs, turns over, fuel, all checked but no go.......
     Back out and take off the valve cover and go thru the valve adjustment again. Things WERE different some were too tight, some OK. Put the cover back on, hook up the breather. Climb back inside and it starts right up.
     Now I don't know whether to trust the #7 or #8 locknut.

On the bright side even with it running so bad I got 20mpg on the first tank of fuel!

Sunday, August 4, 2013

Land Rover raised air intake

     OK, well I want to put one on you know but having difficulty getting bits and just decided to make my own. For the wing interface, first I made a design in my head and then a template out of cardboard.

   I found the center and predrilled a centering hole for a 2 1/16" hole saw. Then the plate was cut out of some sheet steel (18ga?). I drilled the holes for the bolts and the tube all at the same time.
 I have some 2' tubing that came with the 2.5Dt for the air intake to the filter. It had a nice bend in one section. So I cut the tubing in the bend to make an aproximate 90 degree. This was then welded in to place.

    So far the bit was painted with black truck bed coating. This was done because I think it will get plenty of chances to be nicked up and hopefully it will hold up and not rust out so soon.


The underside is not done because I don't know whether it will be a right or a left side. Also procured was some 2' tubing for the bit next to the windscreen. I will have to get hose and adapter for the mushroom top. The top has a 2 9/16" OD on the outlet tube, it should also be bent to vertical.

Land Rover cot

     OK, one of the reasons for me having a 3 door 109 is to be able to sleep inside whilst camping. To this end I wanted something simple and comfortable. I have slept in hammocks and cots before and prefer the cot as it is more comfortable on my back.
     So when trying to figure out what I wanted I looked at varous websites and Youtube reviews of hammocks and cots. I decided on a cot if  I could figure out how to make one fit, and support my mass.
     So after looking around both locally and online at cots one was ordered from an Army surplus online; Armed Forces Outfitters, Inc; www.AFOI.com
     The next day my daughter came over to clear her stuff out of my shed and gave me a cot that was in there...................
     So a few days later when the online cot arrived I set them both up and compared them in my living room. My daughters cot was larger both wider and longer and had better supports and canvas. The next test was to see which fit the 109 better. Ever try to get something long with 6 legs thru a too small door? The army cot fit better in the 109. So I decided to do a sleep test. Over the next few nights with daughters cot in my living room I tried to sleep. I discovered without a pad cots are too cold to sleep in. Having been advised to get a memory foam pad, I did. It was cheap and warmer but not comfortable. The cot is just too tight. I have used my tent cot from Cabeleas with a Thermarest pad for camping so I knew that set up was one I could go with.
     So how to put a 6 legged cot in the back of a 109 without all the legs and poles????????
     I started to think,,, I would need to replace the cot orginal side supports with tubes ala Dormobile. Those tubes would need to be suspended in the bed. One side needs to be held to the side the other span the space between the seat bulkhead and the rear door. Plus it would need to support my weight as I got in and out of the cot.
     I measured the sleeve in the cot and knew I could put a 1 1/2" tube thru it. I also measured the length and folded it over at the "foot" end to fit and pinned it. More on sewing later---
    So the local metal mfr supplied the 1 1/2"x1/8" tubing in 3 80" lengths which I could cut to fit. I also bought some 1 1/2"x1/8 flat stock 4' long. With the flat stock I set about making "J" hooks to bolt to the inner tub capping. It took me 6 trys to get 3 of equal size and shape. In the pics you can see both the J and U brackets.


    Here's my process; Taking about 8" off one of the tubes I could use it as a design aid. With it in hand I could see what would and wouldn't fit in the tub. This is how I came up with the J hook idea. To make the J hook I put the small piece of tube in my vise horizontally. At the open end I clamped the flat stock with vise grips, this I heated up with my propane torch and then using a hammer I bent it around the tube. I made the first 3 this way. They came out the right shape and size but I couldn't recess the hole for the screw head........The next step was to make the hole with recess first, THEN clamp it to the tube and heat and bend. I had to be careful to make them the same length from the hole to the bottom of the bend so the tube would sit evenly along the tub.
     Once this was figured out I set about making the center supports. Sitting in the tub I could see that each end would be slightly different but have the same basic design. A "U" welded to a flat plate. The tube would sit in the U. The front one I designed to hook over the seat bulkhead capping and bolt thru the top to keep it from sliding when weight was in the cot. I was able to make use of my first J hook attemps by using the U section for the plates. The rear is just a flat plate with a "U" welded to it. That is then bolted to the door skin. My door inner skin is steel 18ga IIRC.
     I used 1/4-20 rivenuts to secure both the J hooks and the U plates.


I had to figure out the correct distance apart for the tubes by setting the cot up. To do this I needed to find the right length for the tubes. This was accomplished by measuring and cutting and trial fitting until the side rail fit in it's J hooks. As it was hot inside the 109 I was sweating good when I fit the cot to the tube and put it in the J hooks, then ran the other tube in and go in and closed the door. I could pull the canvas so that it was taut and get a measurement for distance. Of course it wan't going to be easy! I needed to remove the center seat back braces for the front bracket. On the rear door the bracket was right on my access hole for the rear door pull. On the good side the tube was cut to the right length!
    So the seat brackets were removed by cold chisel and drill. The U brackets carefully measured and placed. Holes were drilled and rivenuts installed. The cot with tubes installed and test fitted and tested for comfort and weight. All seemed good with the exception of the fit of the canvas, it is still too long and I have no end support figured out.
     Then all was removed and cleaned and painted. The brackets all installed after drying.


Sewing;  I figured out the length I need and tried to sew the canvas on my machine but neither I nor it was up to the task, My thread kept breaking and I broke a needle, so I'm going to take it to someone to do once I get it all figured out.

     At this point I am thinking that I can install grommets in the canvas and hook them to the seat bulkhead to keep the canvas from sliding. I may be able to do the same on the foot end too just haven't looked hard at it.