4 Aug 2020
I decided to start working on the exterior of my trop top whilst I figured out what to do about the headliner. Starting at the rear third I tried to remove the fungus/ tree droppings. Nothing worked that crapola had etched into the aluminum.
I tried acetone but that only proved good for a quick pre-wipe before sanding. Hitting it with #80 then #120 and finally #220. I had to hand sand around the rivets.
6 Aug 2020
I made the mistake of letting it sit unpainted and the early morning fog and drizzle left watermarks that had to be sanded out again. With that lesson I covered it with Rustoleum 2x primer/paint in gloss almond. It worked out that doing 1/3 at a time did well for me at beating the Summer sun and heat.
7 Aug 2020
Friday saw me doing the center section, the same way, wipe, sand w/80,120,220, hand sand, blow off with air hose and post wipe, paint. It was hot enough that I got 3 or more coats during a day.
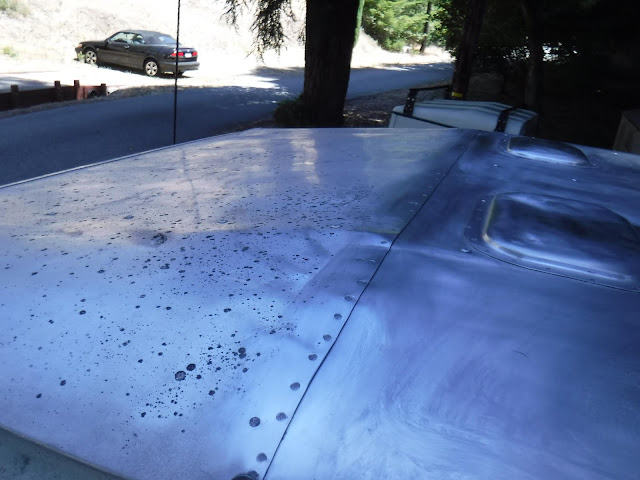
You can see in this pic how 1) bad the spots were, 2) how I overlapped the sanding/painting 3) how banged up this top is.
Looking at the front compared to the finished back.
Interesting how much gloss the paint lost as it dried.
10 Aug 2020
The sunsheet was finished. I had ordered new seals for the alpine glass from Trevor at Rovahfarm; Weatherstrip #302177 and locking seal #DBF500040 both x2. It seemed to take awhile for them, but when they finally got here I was ready.
11 Aug 2020
Probably the original seal.
Very crumbly, This side had seen more sun. Came right off with the putty knife.
This shows the shrinkage gap in the old seal at the top.
At this point with the seal out and the rooftop side empty, I sanded it down, again 80, 120, 220 and post blow down and wipe. This was going to be an all day job! Then a couple coats of paint.
While the paint was drying;
With care I cleaned the glass, eventually I needed to use steel wool on the edges to remove the old seal.
Before steel wool on the left, after on the right.
The shape of the new seal, you can see one side is larger, that is the side the glass fit in. The weird shape in the middle is for the locking strip.
Testing the glass fit.
I fitted the seal and made it about a half inch too long and then crammed it in, this should help with shrinkage over the years
Using Dawn dish soap I lubricated the inner gap for the glass. It took a few tries as I wanted to start it in the top where the seam was, but eventually I came to the conclusion that it needed to start on the bottom. I got it in and by now it was hot and I was in the full sun. I knew I needed to get some of the locking strip in---just in case.
Well I didn't buy the tool, I've seen it done with WD40 and screwdrivers at my old job and used that technique on the rear windows on my 88, Ignotus.
Struggling in the heat I got it started. Using the bottom 180° from the seal seam. I had coated the locking strip with Dawn to allow it to slip in easier.
The heat was on but I got 1/2 of the strip in before I called it a day. Going around the curve was PITA. Along the whole strip I had to push one side and then the other into the seal: one screwdriver width at a time and often it would pop out.
12 Aug 2020
The next morning in cooler weather I preservered. Again making the locking strip about 1/2" longer to account for shrinkage.
Done on this side!
My 109 has a 2 piece roofside, You can see the outside seam in the above pic. On the inside there is this flange and it has a no longer available rubber trim covering. After several websites and inquiries I found somethin I hoped would work. From McMaster-Carr I got 10' of EPDM rubber trim #8693K26. Here is the profile view;
A test to see if it will work, the old stuff is below it.
Not the look I was hoping for, but it will work.
Notches were required at the top.
13 Aug 2020
Rinse and repeat for the drivers side. Remove seal and glass, sand, paint, clean glass, install seal, install glass, install lock strip.
14 Aug 2020
Up early to get the last bit of sanding and painting done ; the rear above the door.
Later that afternoon, on my back porch.
In the mail I received the rubber washers I ordered for under the sunsheet spacers. These were obtained from Primal 23 Industrial, EPDM rubber washers, # EPDM70-101418-25
15 Aug 2020
Old ones on the top new on the bottom
I did one side and then the other. While the spacer was out I removed the old washer and sanded and painted, I also wire wheeled the threads on the machine screws and sanded and painted where the washer sits on the sunsheet.
Lastly I replaced the top washers with stainless ones.
Not bad even if I do say so myself!


No comments:
Post a Comment