I think I said that I had to get the correct clutch internals, disc and pressure plate. It took some time sorting them out over the phone with Travor at Rovah Farm. He was away in Maine straightening up stuff from his recent move. Since I have the series 2 clutch release mechanism I needed the Series 2 pressure plate and 10 spline disc. Well something got crossed in the communications and I recieved the pressure plate and not the disc a week later when parts arrived. So then it was another phone call only to find that Trevor was out of the disc.
So I posted an order from Craddocks in the UK. Another week went by until it arrived, that was last weekend. I went ahead and installed the clutch disc by aligning it with an old pilot shaft I had kept.
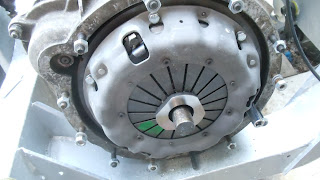

Then I put on the pressure plate slowly tightening the bolts as to get an even tension and finally torquing them down.
Now I just needed help to carry the tranny from the garage to the chassis. First I tried my son-in-law he said he would but I was too tired after a bike ride with my grandson. Next up was my neighbor Bob, now he's a contract worker and had work this week so he wasn't available. I put out an email to my local Land Rover buddies and one of them said he could help later in the week. So yesterday I went and played Disc Golf at the Black Mouse course in Felton. I shot a +3.
After a phone call to Craig we pinned down a time he would come over and he arrived at 0900 this morning. After looking over my project we carried the tranny over to the chassis and set it there.
A few more minutes of BS and Craig went home. I got busy as the 109 was still in the shade and today was going to be warm. I moved the engine hoist into position and then had to put some plywood down so it could roll. I then put on the legs, got out my sling and hooked up the tranny where the gearbox and transfercase bolt together. The hoist lifted it up and I rolled it into position above the chassis.

Carefully opening the valve allowed me to slowly lower the tranny in. The front was nose down and as it lowwered I pushed it into the pilot hole of the clutch pressure plate and then the disc. Twas then I realized the rear prop shaft had to be removed as the park brake wouldn't clear it. So off it came. Again lowering it slowly it lined up on the bolts and that's when I found out that one of the bolt holes with a Heli-coil was crooked, Always @#$%^$!%& something! A few hits with a hammer straightened something out and then the bolt holes all lined up and the tranny began its slow slide on....
I got it far enough on that I knew the splines were lined up and started some of the bolts and pulled the 2 cases together. Then I finished bolting it down and lifted it up and removed the block under the engine and set the tranny back down onto the mounting brackets. Not a perfect match but with the aid of a prybar I got all 4 bolts in and tightened down. Then I reinstalled the rear prop shaft, this is when I found a broken zerk fitting on the forward ujoint.

It wasn't easy and needed some twisting and pushing and raising and lowering and turning of the gears to line up the splines but it went on!!!
By now the Land Rover was almost in the sun so I hurriedly put things away and went inside and had lunch (Cheese and pickle sandwich for those counting).
But I was too excited to sit out the noonday sun! I carried the bulkhead out and went to work fitting it. I had to ream the holes for the bolts and then it went on, it is a heavy item now with all the sound/heat proofing and vents, ect on it. I was sweating due to the sun and the hearculean effort of lifting it into olace by myself. But, HEY it's ONNNN!!!
Now it feels like I have finally made some progess. Next is putting on the body and windscreen and doors and roof! Plus figuring out what I'm going to do about that ujoint....I couldn't remove stub with an ez out.


No comments:
Post a Comment