Dec 4 2021
About a week ago I went out and noticed a drip under my 109. Crawling under I saw oil dripping from the parking brake drum, the xfer case, crossmember, maingear box. Basically it was everywhere. DRAT!
I've known that my seal between the main box and the transfer case was shifting oil to the xfer case. When I'd check the oil levels the main would need topping off and the xfer would be overfull and discolored.
I just let it go not wanting to do the job of swapping out transmissions.
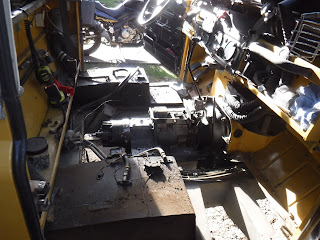
Now push had come to shove. I needed to do the swap. So out came the seats, cubby box, floor boards, tunnel, seatbase, knobs for shifting and the linkage for the Roamerdrive. That was day 1, it really helped to have a cordless drill with 7/16" and 1/2" sockets for spinning off the fixtures!
Day 2 saw me cleaning the underside of the seatbase and making some nutbars and pop riveting them to the seat base. It was so hard to reach some of the nuts around the fuel tanks with a wrench, this will make it easier and quicker. Below are some of the pics from that.
I had to clean the seatbase mainly because the large washers I used and the factory re-enforcing plate had rubbed into my extended range fuel tank. I thought it was the nuts before I took it off and could see the witness marks. I put smaller washers on.
Along with the smaller washers I removed a section of the factory plate.
Using my spare transmission I made some new paper gaskets using the machinist hammer technique.
On Day 3 I removed the rear and front prop shafts and drained what was left of the oil, then took the overdrive out.
As I went along I cleaned things and tried to figure out ways to stop leaks in the future. I covered my fuel tanks with bits of an old pink blanket, more to keep me clean when I leaned on them!
The 4th day I had to take off the drive gear for the Roamerdrive. I was concerned because the night before I thought the gear was damaged when I pulled the OD off.
Interesting that the nut on the mainshaft gets torqued to 100ftlb, though once the setscrews wer loosened it spun right off. Just like the factory nut. Once I cleaned up the gear I could see there was no damage. WHEW!
Then came the hard part. I had been thinking of just swapping transmissions and in the back of my mind was the growing seed that I could just change the seal in situ and not have to mess with the clutch and all it's adjustments, drilling the new bellhousing to fit the 200 flywheel housing.
I thought about it as I pulled the xfer cover off, removed the parking brake, speedo cable, dipstick for the xfer case(Roamerdrive part) Took out the intermediate gear shaft and the associated thrust washers. Then and only then could I get to the internal nuts that help hold the xfter case to the main box.
Lastly the oil thrower was pulled out exposing the nasty seal and this was prised out. Exposing the bearings inside.
The new seal was difficult to fit. I froze it and put on some Permatex black oil resistant goop. I just couldn't get the damn thing started. I tried about 50 times and it just kept twisting out. I needed something that would press on all the sides (do circles have sides?) at once. I looked high and low and didn't have anything round that would work. I did have some 2" square tubing that fit, so I tried that with the same result, one side would partly go in and then it would all go cattywampus.
I did the next thing I could think of; I got a bigger hammer, a small 2# sledge I've had forever. A light whack did nothing, so I squared things up and hit it hard!
Damned if it didn't go halfway in! Keeping on tapping I pressed it into place and put on the oil thrower.
The first pic shows wear on the thrower, the middle is it all together and the last is the new seal. p/n236305
Day 5 was spent putting the xfer case back on. What a mess I had with that!
I put the new gasket on the main and carried the cleaned up xfer over and finagled it into the cab, balanced on the RHD tank and the main box. Then I could climb on the crossmember with my left foot and the chassis rail with my right, tilt the box to the LHD and drop the gearbox mounts under the exhaust pipe, level it out and slide it on. Simples! Only once I got it under the exhaust it was too far too heavy for this old guy to futz with. Then I squeezed my legs down between the crossmember and the xfer with my feet on the ground. A much better position for leverage both forward and up/down.
Only thin is it wouldn't line up and go on. WTF, it came off this way? After about 20 tries, nothing worked. Why, hmmmmmmmmmmm damn if the main is too low, hmmmmmmmm CRAP I FORGOT TO SUPPORT THE ENGINE!
Now I'm standing there with the xfer resting against my legs to keep from dropping to the ground and needing to lift the main. I was trapped! It took me around 5 min to figure out how to extricate myself, I was tired from the recent struggle. I had to put the xfer back on the fuel tank and main and climb out. I got my floor jack and a block of wood and jacked the main up, then climbed back into my trapped position and lowered the xfer into place. It still didn't fit! I needed 1 more pump on the jack to lift it high enough. Luckily I was able to reach the jack handle by leaning out the drivers door.
It slipped on! I removed the jack and lined up the mounts and put bolt in them loosely, then set about bolting the xfer up to the main. It was a long day!
The only pic I got from that day is showing the success of wiring and rtv-ing the anti-rattle spring to my hj-lo lever.
Day 6 was spent bolting up the Roamerdrive gear and the xfer internals, cleaning the covers and sealing surfaces. Bolting on the front and rear propshafts. Hooking up the handbrake, speedo, xfer dipstick tube.
Day 7; Really! it was that frelling long? Remember earlier I said I was cleaning and trying to keep thing from leaking? Well 2 things stood out; the first was the lid on the top of the main box for adding oil. Last time I had added a piece of inner tube to help seal it. It kinda worked, but the rubber couldn't handle the oil or the temps or both. So I tried making a cork gasket.
Idiot that I am I made a full size one and then realized that like the stock one it had to fit in the recess to seal. Then I didn't get a picture of it.
I also thought it would be a good idea to increase the tension on top by bending the retainer. WRONG! I tried to bend it with hand pressure and it broke. I did say I was an idiot.......
So I made a new one.
I'm really kinda proud how this one came out!
The second thing was the seals around the selector shafts. Everyones leak and they are a pig to replace! I decided to make a cork gasket to fit under the metal retainer strips and over the seals. I used the retainers as a template.
Cut holes and slots to weave the cork around the shafts.
And flubbed it up a couple of time but I got er done.
Time will tell.
A little more clean up and I put in the seatbase, seats, cubby, tunnel, floorboards, added oils.
Day 8 I went out around 1300 and looked at my handiwork. drip,,,,,,,,,,, drip,,,,,,,,,,,, drip.
F&^%! Closer inspection showed the front output shaft was leaking. Crestfallen I went inside to mourn.
After a bit I checked the repair manual on the process, not much info really. Then looked for a part number and got more discouraged asno one had the seal until I found that it had been superceded to FTC1780 and I had 5 of those! How hard could this be?
Remove xfer oil
Remove the front propshaft
Remove the cotter pin in the retaining nut
Remove the retaining nut
Remove the flange for transfer case
Remove retainer for oil seal
Now the last step is $%^&*() there are 6 nuts holding on the retainer, I found 13mm worked best on mine. 5 came off no problemo. Why is it always the last one........... I couldn't get a wrench on it to loosen it. I finally wound up cutting the closed end off a combination wrench to about 2" long and smacking it from below with the butt end of a hammer.
Once it was off I dropped the retainer off and at my work bench prised out the seal with much hammering and gnashing of teeth! I was full of smiles though when I gooped it up and used my newly made seal installer tool to set it quickly in place.
I offered the retainer up but on a few nuts finger tight and the tried to tighten that difficult nut. What I was able to do was get it mostly tight then hook the hole in the end of a 12" adjustable wrench and pull down with both hands. Tightened the rest of the nuts.
I reinstalled the bits and getting that flange retaining nut tight was a bitch! A 3/8" rod stuck thru the flange/propshaft bolt hole and blocked from turning with a 1/2" 12" socket extension did the trick. Since I was all greasy I went ahead and in the dark put on the front prop.
It was dark and cold as this took about 3 hours to do. Oil would wait till day 9.
Which believe it or not came the next day! Amazing how that works.......
I grabbed a pitcher from the kitchen and poured the oil from the bowl I had captured it with. Then opened the fill plug for the Roamerdrive and with the help of a funnel slowly poured it back in, stopping every once-in-a- while to look for leaks.
NONE! Woot! woot!
I put the floor and cubby box back in cleaned myself up a little and took it out into my street for a test.
No leaks, the clutch seems to engage a bit lower(?) the added cork to the shifter seal has increased the effort to move the lever, I imagine it will break in. I've not tested the parking brake yet...
So all well for now I suspect.
I wanted to add a couple of piccys of my workshop.
Dec 11 update;
On Thursday I had to go to the VA a one way trip of 38 mi. Over a 2000' hill. When I arrived I was pleased to see there were no leaks dripping.! YAY. After my appt I came out and it was still drip free.
So I drove home another 38mi. Upon arrival I saw it was dripping in more than 1 place. S**t......
I crawled under and started wiping everything down so I could trace the leak. That is when I noticed that my stock fuel tank was dripping diesel.
On Friday out came the seat cushion and off came the seat lid. As I cleaned the top of the tank I could see the return fitting had bent the tank top, most likely from either me setting the xfer case on the fitting or just from leaning on it while working. How do you pull out the tank?
First I had to get the fitting off, 2 machine screws, one of which is under the lip if the seat base. I wound up drilling a hole in the lip to use a screwdriver in the screw. So much easier!
Next I cut a slot about a 1/2" up on a 1/2" rod to insert in the 3/4" hole. This I slide on the side of the dented tank and pulled up. That got the tank lip level, but the space past where my rod could reach was still uneven.
I literally spent a couple of hours making a hooked thingy with a 1/4" bolt in the top by welding 3 pieces of steel together and by the time I used it the weld was so thin(from grinding/shaping) it just broke.
The next one is more simple; a 5/16-18 bolt with a nut fully threaded and then a loose flat piece of 1/2" steel and finally another 3/4" wide piece of 1/2" welded to the bottom. All was then ground down to fit in the hole. Once in the top plate was driven down to the lower plate by the nut while holding the tank in between. It did flatten out the tank!
I made a new cork gasket for the return fitting and put it all back together. Tightened all the nuts and bolts on all the covers, adjusted the parking brake.
Today I made a test run to the hardware store, 8mi round trip, with the seat lids off. NO LEAKS! Then I went grocery shopping, that's a 30mi round trip, and when I got home............NO LEAKS!
Whew.....Now it's going to rain for a week.
Dec 30 2021 UPDATE;
I have had it out and about and had a couple of runs at highway speeds, 65-70mph, mostly around 60-65. It seems quieter, less high pitch droning, plus it is shifting better between 1st/2nd, I find it just snicking on into 2nd when I go for neutral on the double clutch! YAY!