I have been trying to get my trailer ready for a trip and over the rainy season(what little there was of it) I saw that the roof to roof side leaked terribly. There is a 1/4" gap at the end mainly due to me chopping the roof sides.
So I want to figure out how to seal it up. Online I found Steele Rubber Products; Steelerubber.com
and I looked at some products and emailed for a sample of the 2 I thought would work. Lucky for me I made a mistake in a part number and the sales rep, Don, contacted me for clarification.
a few emails sailed back and forth and Don said he would send some samples of what he thought might work, after seeing my pictures.
Well he sent me 4 packs of samples and 2 catalogs!
While I was waiting for the samples I took the trailer for a shakedown drive. I have not used it since bringin it home, but intend to soon.
I stopped for this picture after about 15 miles and then went another 1/2 mile and when I got out I saw this;
I lost 3 lug nuts and the other 2 were close to falling off. I walked back to where I had parked and found 2 on the way. One is gone forever. I looked at some interesting geology on the walk back. some 58-22Ma old sandstone formations. I jacked up the trailer and put on the lugnuts. I had had the wheel off late last year checking the brakes or lack of. Guess I forgot to tighten them.....
The packs of seals arrived and I had to unbolt most of the roof top. Sorted thru the ones that looked like to me they would work and put them on. Whittled it down to the last 2 and will order 1 of those after another question to the rep.
At the same time I looked to see if any of the seals would work on the tailgate. A couple would, but then I noticed that the chassis hinge points were wrong, very wrong. A PO bodge.
See how the pivot keeps the lower part of the gate away from the body? It is about 1/2" too far away. Overnight I sifted through my options, finally deciding on removing the bodge and making some more original looking "ice cream cone" style ones. I had some 5/16" flat stock so it was a go.
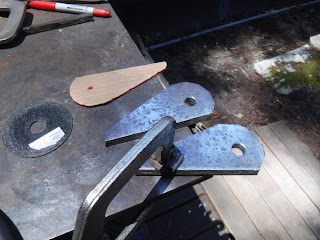
Using the stock form off my 109 I made a CAD (cardboard aided design) template.
Then a pair was laid out on the flat stock and the hinge hole drilled in to keep a central location to work off of.
Using an angle grinder and a cutoff wheel, or 2, the hinges were roughed out.
I wanted to sand them down to size in my belt sander , but crap they got HOT quick. It was going to take f o r e v e r.. I went through some itinerations and settled a 1/2" bolt clamping them together and keeping away from the heat with vise grips.
This got me a nice looking pair of hinge points;
Some measurements and a test fit showed them to still be 3/16-1/8" too large still so out came the angle grinder again. I had not compensated for the felt pens throwing the outline off. So more sanding......and ending up with the right size/shape.
Test fit next to the bodge;
Well it was HOT today when I cut off the bodge on one side and my worst fear was realized. The PO had not cut off the hinge, but instead cut them out.
More frelling work! I straightened the cut up and made an insert to fit and welded it in. It was mid 90°F and I was in the direct sun, It's not easy getting up and down so many times any more and carrying tools and the welder back and forth.
But I got 1 done! :^)
Tomorrow #2.............Oh wait I have to go grocery shopping in the am. hmmm
22 June 2020
I went grocery shopping in the am and there was still some shade to work in so I cut off the PO bodge on the right side. As expected the original hinge was cut out.
I made a new piece to let in and cleaned it up.
Then I quit for the day as the sun was shining brightly.
23 June 2020
After a leisurely morning, I headed out and welded in the insert, installed the tailgate to locate the hinge and welded it in.
Paint!
Since the pivot was now 1/2" closer the tailgate hung down when open, so I screwed up and cut off 2 links on both sides. Now it sits at an upangle.
However it closes nice and there is maybe an 1/8" movement to wiggle and not the 5/8" gap that was there previously.
It does look nicer closed now!
1 July 2020
I received the weatherstripping and installation went smooth. One side was still unbolted so I propped it up with a block of wood and making various cuts for corners ect, I pressed it in and set the roof side down. I put some of the bolts in loosely so it wouldn't fall off when dealing with the other side. I was finished in just over an hour and I can't see daylight from the inside!!!!!!!!!


No comments:
Post a Comment