Well you knew it was coming, right? If I went ahead and converted the white gas stove I'd have to get a tank or deal with all those 1# bottles. So after some forum discussion I went for the 5# tank and a 12' hose.
Then I had to decide where to put the bloody thing! Some of my considerations were; must be outside if possible, accessible to the stove (also the reason for the 12' hose) and the little buddy heater, out of the way from a car accident. Since I do not have rear side windows I chose this spot out back if I could make it work.
The tank will fit there.
Going online I looked at propane tank mounts and nothing seemed ready made for my spot. I loath to put holes in my body for several reasons and wasn't sure the skin on the roofside would hold a full bottle bouncing around the countryside. I looked for, like a rollbar mount but didn't find one, there were some DIY ones though.
What I came up with was a piece of superstrut that I could make a clamp for the raingutter at the top.
So wielding a hammer I bent a piece of 1/8" x 2" into a 3/4" "C", this I put 2 holes into the top section for 1/4" bolts.
Some fine tuning of the depth had to be done for it to fit right on the gutter, it was then welded to the strut.
And test fit where even MORE fiddling took place to get the depth right.
I welded 2, 1/4-20 nuts to the c clamp and fitted it.
But that just left me hanging on how to attach the bottom.
I was hoping to find some close ready bolts to make some sort of bracket to attach to so I wouldn't drill any holes, but NOTHING was close, I settled with the idea of drilling out 2 of the capping poprivets and installing riv-nuts--see the red circles in the pic below.
BUT I REALLY DID NOT WANT TO PUT ANY HOLES IN... I took a break and had a think, what was needed was a support from the grab handle on the rear crossmember.
I didn't have a piece of strut that went the full distance though. So I cleaned up one end of the piece I had with my new to me disc sander.
And used it to lengthen the section with the c clamp on top.
This gave me plenty to make the length I needed.
While that was hanging there, I saw that a bracket coming off the tub mount would be a better/easier/cleaner design. Again using the 1/8" x 2" stock I had, I cut a 4.25" length, marked the holes and drilled 5/16" holes.
Once held in place on the tub I could mark it for the bolt hole for the strut. I was drilling the hole for the bolt when I realized that this won't work as the bolt would have to penetrate the body. POO!......
OK then let's put the bolt in from the other side and weld it on! This I did using a 5/16-18 x 1" bolt.
Here is what it all looks like bolted up.
That took care of day 1.....lots of unbolting and fiddling and more bolting and unbolting and welding and grinding and cleaning and bolting and painting and did I mention bolting?
21 May 2020
Originally I thought I could get away with just some sort of clampy thing like a big hose clamp and the tank would nestle in the recess of the strut and not wiggle around. It didn't take too long to see the weld on the side of the tank wouldn't let that happen. I needed a real support!
Again I went to the web and looked at tank mounts, I found one that had some slots cut in it to hold the leg(?) of the tank and I thought I could do something like this pretty easy. What I needed was some 3/16" x 1.25" flat stock. I didn't have any, in fact I didn't have any 3/16" anything and due to the pandemic everyone is closed.
Time for a rethink, methinks.
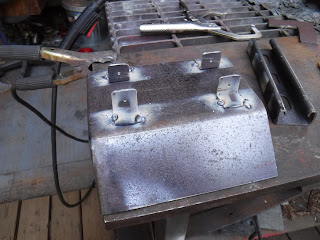
Mucking about in my metal stash I found a piece if 15ga big enough to make a shelf bracket out of. Sadly, I didn't take any pics of the bending process as I got too involved mentally. I also had to make up some, (4) angles for brackets out of 1/8 "x 1/2" flat bar I had. I used a section of strut to hold the angle brackets in place and tacked them on.
Only one of them had one side askew and had to be redone. Here is what the front looked like;
Of course it was all eyeball and guesswork. I marked the position of the mount on the strut and proceeded to drill the holes for it.
I knew from my online research that I should have some sort of retention system for the leg of the tank. I decided that I would make an arc out of some 1/8" x 1/2" flat to weld on the base. I used the leg of the tank for the shape first the outside and then using clamps to pull it into shape on the inside.
Hmmmmm, not run into this before, looks like I may have to do a second page, won't let me text past the next picture!


Looks good Gene, you will also have a spot if you need to hang anything else out there beneath the tank. Sean
ReplyDeleteThanks Sean, I thought of that, might make a nice spot for my Swiss Army shovel. Get it out of the vehicle.
ReplyDelete