It has been a frustrating time the last few weeks trying to get the fittings sorted out for the fuel and oil cooler systems.
The previous owner had let the shop doing his swap just cut hoses and pipes and reuse fittings on his 200tdi. So I wound up with no fittings for the fuel system.
Trying to find them on the web or in my parts book was a waste of time even emails to Craddocks was fruitless as they had no idea what was supposed to go on. They offered an educated guess.
Also missing was the fan belt and alternator pivot bracket/bolt/spacer. I could find the bolt and bracket and bought a bracket online from Rovah Farm. I had purchased a belt from them earlier, when I realized that I would need one.
The spacer was more difficult. It showed on the parts drawings but had no number attached, even Craddocks failed to find one. So I made one. I put the pivot bracket up to the face of the alt and measured the distance to the face of the block. I then had to get some spacer material but first I need a bolt so I knew what size i.d. was needed.
I tried 3 hardware and 2 autoparts stores and one Brit car repair shop but nobody carried a M8x100x.75. I had to go to Fastenal and buy 10 of them..........
I stopped at the hardware store and bought a stainless steel 4 in. pipe nipple that had the right i.d.. At home I cut it down to the correct length. Then installed the spacer/bolt/pivot bracket.
Next was the fan belt----WTF? it won't fit, too short so I check online with Rover Farm did I get the correct one? Yes, that's supposed to fit.
Well my alt has the bulge from the bolt hole that hits the block before the belt can go on.
So I try my spare for my 2.25, it fits but is pretty large with almost no room for future stretching. So drive into town and get the next size up belt, 10mm longer. It too is too short!
The next day go back to town, 14 miles each way, and get the next larger belt another 10mm. This one fits! Finally!! I had bought 2 so I have a spare.
Adjust the belt tension and tighten everything up.
On to the fuel lines;
I removed one of the inlet fittings from the injector pump and took a spare fuel lift pump down to the Hose Shop. There Linus was able to make correct fitting choices and provide me with some pipe to flare and connect hoses to.
Of course my flaring tool wouldn't hold the steel pipe so I could flare it and my tubing bender does not have a 5/16 groove for bending--------Arrgghh! But I did my best, but it wasn't satisfactory.
So the next day I asked Linus to come up and help me sort things out. He came up after work one night and we looked it over and decided to return to the Hose Shop to make good fittings. It took us 2 hours of cutting/drilling/soldering to get them done. We made fittings that bolt on not just slip a hose over and use a hose clamp. But he only had 3 fittings for the hose connections so I had to wait on those for 2 days. I took this time to fit the new fittings in place and measure for hose length. Here Brian and I discoverd that the fittings would make an "S" shape for the lift pump to injector pump. So once again a fitting would need to be changed.
When the fittings came in we went down and shortened the injector pump pipe and made it vertical to eliminate the "S". Whew, things then went together.
On the oil line front; things were too congested at the crossover point for the hoses. So I wound up making a longer pipe for the bottom connection with an "L" pointing along the frame towards the oil filter. This meant the hose needed to be shortened and a new fitting crimped on, so back to the Hose Shop. I put it on today and it all fits nicely!
The fuel tank;
I bought a new diesel fuel sending unit and went to put it on. I saved the screws from the old tank but they wouldn't work :^(
I used one from the shipping cap to find the correct size and bought 6 new ones. This installed the sending unit.
We(Linus and I) made a 3way connector for the diesel return line at the tank to fit the spill rail(3/16) and the injector overflow(5/16).
I put some of the Right Stuff around all the outside seams on the fuel tank. My hope is to prevent water from getting inbetween the tank and skid plate where they rust out. Even though my tank has been in my front room since I bought it rust has formed where the brackets are welded on. Crappy paint job!
All this while helping Brian get his tranny put together, figure out why the Roverdrive wouldn't go back on. Getting it on and bolting up the bellhousing only to find a leak in the clutch throwout box. Pulling the tranny again and fixing the leak and reinstalling said tranny and roverdrive all in the last 2 weeks. Sandwich in a train trip to Nebraska and helping Linus drive home a 64 109 that took 5 days. Plus 2 to recover from the trip!
Tuesday, April 17, 2012
Sunday, March 25, 2012
Land Rover tub is on
Ok on Wednesday, Brian and Matt came over and we put the tub on the chassis. It was pretty straight forward. Carry it out of the paintbooth and put it on the chassis. first we moved the chassis forward so we could come over the back instead of lifting it up over the motor.
Thursdsay I took the oil cooler down to the media blaster to get the rust removed from the supports. In the afternoon I bolted down the tub. For this I had made some spacers out of HDPE (high density polyethelene) I used stainless hardware and antiseize.
Here is one of the alli ones and some of the hdpe spacers.
Brian has finished painting my radiator support panel and I put it on. Waiting on the oil cooler to be installed to take some photos. It is still at the blasters at this time.
Thursdsay I took the oil cooler down to the media blaster to get the rust removed from the supports. In the afternoon I bolted down the tub. For this I had made some spacers out of HDPE (high density polyethelene) I used stainless hardware and antiseize.
Here is one of the alli ones and some of the hdpe spacers.
Brian has finished painting my radiator support panel and I put it on. Waiting on the oil cooler to be installed to take some photos. It is still at the blasters at this time.
Thursday, March 22, 2012
oil cooler fitment
Sunday, I started fitting the oil cooler and radiator. I knew that I would need to remove some metal from the radiator support panel to allow the hoses to pass by. I just wasn't sure where and how much. I also need to find out how I was going to secure the oil cooler itself and see if I had enough clearance for the fan.
I started by bolting in the radiator support panel, I had to fabricate the rubber support pads for the install. Next I slid the oil cooler into the rad panel and set the radiator into position. This I loosely bolted in to keep it from falling.
Then I checked the fan fitment, it was good so I put it away. I have room for either the 2.25 steel fan or the 2.5 plastic fan. Unless I overheat I'm going with the steel fan.
Then I played around with the oil cooler(OC) placement. I had to have the bottom fitting on the left side away from the steering relay(RHD). One of my brake line clamps was in the way and would have to be changed. I marked the slots for the bottom brackets so I could drill mounting holes. The new hoses were slid into the rad panel and mounted to the oil filter housing. I marked the places where I would remove the material and took everything apart.
Using a flat round disc of the approximate arc I outlined on the rad panel where I need to cut. I cut arcs to try to avoid stress risers from square cuts. I wound up using my Dremel tool to cut the arc out and burned it up in the process. A little time with a hacksaw and metal files cleaned everything up! I refit the panel and checked hose clearances. All's good.
I called Brian up for coffee and gave him the panel to paint for me.
Returning home after coffee I decided to fit the fan belt. I had purchased it last year from Rovah Farm. Try as I might I could not get it to fit it is too small by maybe an inch! It's always something......The lump on the side of the alt hits the block. Then I don't have the spacer for the pivot bolt for the alternator. Now I'm trying to find the part number. It is this kind of stuff that makes it go so slow. I wish I could just go to my nearest Halfords and pick up the parts as needed@@##$@!I did try my belt for my 2.25 motor and it fits but is a little large. I will go to my FLAPS (Friendly Local Auto Parts Store) and see what I can get to fit. Thankfully I'm not on a deadline!!
I started by bolting in the radiator support panel, I had to fabricate the rubber support pads for the install. Next I slid the oil cooler into the rad panel and set the radiator into position. This I loosely bolted in to keep it from falling.
Then I checked the fan fitment, it was good so I put it away. I have room for either the 2.25 steel fan or the 2.5 plastic fan. Unless I overheat I'm going with the steel fan.
Then I played around with the oil cooler(OC) placement. I had to have the bottom fitting on the left side away from the steering relay(RHD). One of my brake line clamps was in the way and would have to be changed. I marked the slots for the bottom brackets so I could drill mounting holes. The new hoses were slid into the rad panel and mounted to the oil filter housing. I marked the places where I would remove the material and took everything apart.
Using a flat round disc of the approximate arc I outlined on the rad panel where I need to cut. I cut arcs to try to avoid stress risers from square cuts. I wound up using my Dremel tool to cut the arc out and burned it up in the process. A little time with a hacksaw and metal files cleaned everything up! I refit the panel and checked hose clearances. All's good.
I called Brian up for coffee and gave him the panel to paint for me.
Returning home after coffee I decided to fit the fan belt. I had purchased it last year from Rovah Farm. Try as I might I could not get it to fit it is too small by maybe an inch! It's always something......The lump on the side of the alt hits the block. Then I don't have the spacer for the pivot bolt for the alternator. Now I'm trying to find the part number. It is this kind of stuff that makes it go so slow. I wish I could just go to my nearest Halfords and pick up the parts as needed@@##$@!I did try my belt for my 2.25 motor and it fits but is a little large. I will go to my FLAPS (Friendly Local Auto Parts Store) and see what I can get to fit. Thankfully I'm not on a deadline!!
Wedding day
Ok so I know you're into other things but THIS IS MY DAUGHTER! My only daughter.
I went over to the Maid of honors house around 2 and my daughter was busy getting ready. So I waited until it was time to go and we started off for the beach where the wedding was to be held(Twin Lakes, in Santa Cruz) A phone call to the groom sent us back to the house as he was not at the beach yet and it would be about 15 min before he was. So we waited......
The next phone call said he was there and the guests were waiting, so off we went! A few short minutes later and I was parking my Range Rover(rover content) at the edge of the beach right in front of the guests.
Missy the MoH got out and Marette and I waited while Missy had a chance to get into position.
Then I opend the door and let Marette out and turned to face the guests. It was at this moment I realized I would be facing them and we proceeded to walk down the sand to the waiting guests. As we walked we talked about not tripping in the sloping sand and seaweed!
I handed her over to her betrothed Andy and as the reverend asked I gave her away. Then I stepped back and as Marette wished I took the pictures I share with you.Mr and Mrs Towne!
I went over to the Maid of honors house around 2 and my daughter was busy getting ready. So I waited until it was time to go and we started off for the beach where the wedding was to be held(Twin Lakes, in Santa Cruz) A phone call to the groom sent us back to the house as he was not at the beach yet and it would be about 15 min before he was. So we waited......
The next phone call said he was there and the guests were waiting, so off we went! A few short minutes later and I was parking my Range Rover(rover content) at the edge of the beach right in front of the guests.
Missy the MoH got out and Marette and I waited while Missy had a chance to get into position.
Then I opend the door and let Marette out and turned to face the guests. It was at this moment I realized I would be facing them and we proceeded to walk down the sand to the waiting guests. As we walked we talked about not tripping in the sloping sand and seaweed!
I handed her over to her betrothed Andy and as the reverend asked I gave her away. Then I stepped back and as Marette wished I took the pictures I share with you.Mr and Mrs Towne!
Tuesday, March 13, 2012
Land Rover military oil cooler
I obtained a ex-MOD Series oil cooler from P.A. Blanchard in the UK.(https://secure.pablanchard.co.uk/forsale.asp)
With the motor in I can now try to fit the oil cooler and radiator. Brian had almost painted the radiator support panel first but we caught it in time cause I know I will have to do some cutting on it.
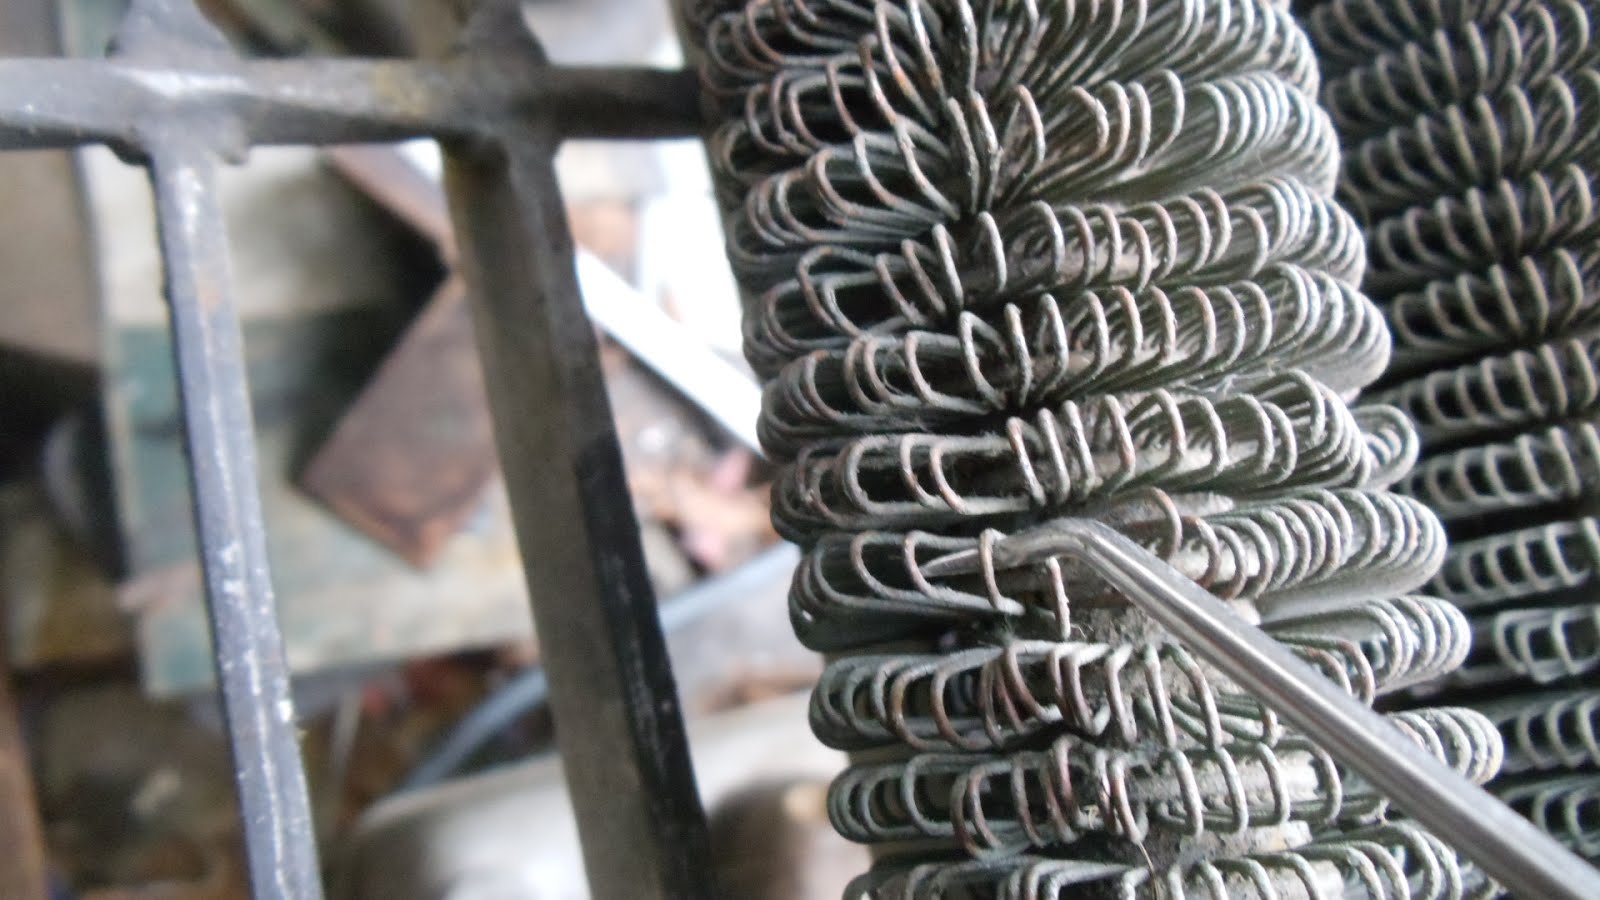
The cooler I got had some cosmetic damage as some of the cooling loops were bent. So I decided to straighten them out. You can see by the photos how it was done. I have a set of picks for pulling out o-rings and seals and stuff. I used one of these to grab a loop and pull it into position. Depending on the direction it needed to move I used either my right or left hand, not so easy if you are not as ambidextrious as I.
Sometimes the loop was kinda crushed, I found that if I hooked it on the fatter section of the hook I could pull it up and wiggle it side to side and it would take the orginal shape. It took about and hour to do the whole cooler, tedious but I like the result. I also plan on having a smaller mesh in front of the cooler so this kind of damage won't happen.
I have the oil lines from both the 2.25 and the 2.5 but neither would work for the hybrid setup. I need the 2.5 fittings on one end and the 2.25 fittings on the other. So I am going to have custom hoses made up at my local hose shop. Fortunately 1 of the guys who works there has the same setup on his 88.
I am looking for a new top for the thermostat housing. The 2.5 has the outlet going to the side and I need one of the 2.25's that has the vertical outlet. KISS=keep it simple stupid.
So now it is raining, probably for then next 5 days. I will do some reading on the motor as I am working out what hoses and wires are supposed to go where. When they removed the motor they just removed bolts and cut hoses, I got a bucket with loose parts.........
I set up the boost hose to the injector pump and the spill rail hose to the injector pump. I think I know where the fuel line goes from the fuel pump to the injector pump. I don't have a parts catalogue for this motor but have a Haynes and a LR workshop manual. Neither of which is as good as the old Series manuals!
I also have 2 Warn 8274 winches that I need to overhaul. I moved these to my back porch so they are out of the rain. Then Saturday my daughter is getting married.
With the motor in I can now try to fit the oil cooler and radiator. Brian had almost painted the radiator support panel first but we caught it in time cause I know I will have to do some cutting on it.
The cooler I got had some cosmetic damage as some of the cooling loops were bent. So I decided to straighten them out. You can see by the photos how it was done. I have a set of picks for pulling out o-rings and seals and stuff. I used one of these to grab a loop and pull it into position. Depending on the direction it needed to move I used either my right or left hand, not so easy if you are not as ambidextrious as I.
Sometimes the loop was kinda crushed, I found that if I hooked it on the fatter section of the hook I could pull it up and wiggle it side to side and it would take the orginal shape. It took about and hour to do the whole cooler, tedious but I like the result. I also plan on having a smaller mesh in front of the cooler so this kind of damage won't happen.
I have the oil lines from both the 2.25 and the 2.5 but neither would work for the hybrid setup. I need the 2.5 fittings on one end and the 2.25 fittings on the other. So I am going to have custom hoses made up at my local hose shop. Fortunately 1 of the guys who works there has the same setup on his 88.
I am looking for a new top for the thermostat housing. The 2.5 has the outlet going to the side and I need one of the 2.25's that has the vertical outlet. KISS=keep it simple stupid.
So now it is raining, probably for then next 5 days. I will do some reading on the motor as I am working out what hoses and wires are supposed to go where. When they removed the motor they just removed bolts and cut hoses, I got a bucket with loose parts.........
I set up the boost hose to the injector pump and the spill rail hose to the injector pump. I think I know where the fuel line goes from the fuel pump to the injector pump. I don't have a parts catalogue for this motor but have a Haynes and a LR workshop manual. Neither of which is as good as the old Series manuals!
I also have 2 Warn 8274 winches that I need to overhaul. I moved these to my back porch so they are out of the rain. Then Saturday my daughter is getting married.
Tuesday, March 6, 2012
109 motor is in!
Yesterday Brian and Matt came over to help me put in the 2.5Dt. We got the cars out of the way and were ready to start the hard work but I couldn't find the engine mounts. On one side I had to grind away part of the rubber to get it to fit the mounting position.
So I HAD to find the one I already modified to fit. I knew where it was and quickly searched the garage but it wasn't there. So I looked in the shed,, not here either. How about in the house or on the back porch? I have parts everywhere and will be glad when they are all in one place, on the 109! But no not in the house or on the back porch.
Back to the garage again and sort thru the mess with a flashlight. Not in this box, not in that one. Meanwhile Brian and Matt are catching up with each other. I go thru the stuff pretty quickly but still no joy. So now I make a more detailed search and halfway thru Matt joins me in looking. I've been looking for about an hour now and am totally frustrated. I KNOW I haven't thrown them out. So I search everything I haven't opened yet, still no joy.
I'm tired of looking and now it's getting too late to start the install so I send Brian and Matt home. We end the day with promises of if I find them then tomorrow we can put it in.
They leave and I go in for a late lunch wondering WTF did I do with 'em. Now it is about 1530H when I go back out to the garage with fresh batteries in the headlight and I start a systematic search in a counter clockwise motion. I open every box read the label on every bag and feel the contents. Move the large stuff and look under, in and around everything!
No joy :^(
So I start the same routine on the contents of the shed. I am back in the corner looking thru a box of bits and my neighbor comes over to talk. We chit chat and the topic of my search comes up and I explain what I am looking for. I am about to give up and order a replacement so I can modify it to fit.
My neighbor leaves and I see a plastic tub under my daughters 88, it's been knocked over and is upsidedown. I pull it out and remember it had stuff for the 2.5 in it. So I opened it and there was the motor mounts! I KNEW I had them somewhere!!!
So I called Matt and Brian and told them it was on for today! We met at 1100(well Brian and I, Matt showed at 1120) for coffee in town and after that we headed to my house.
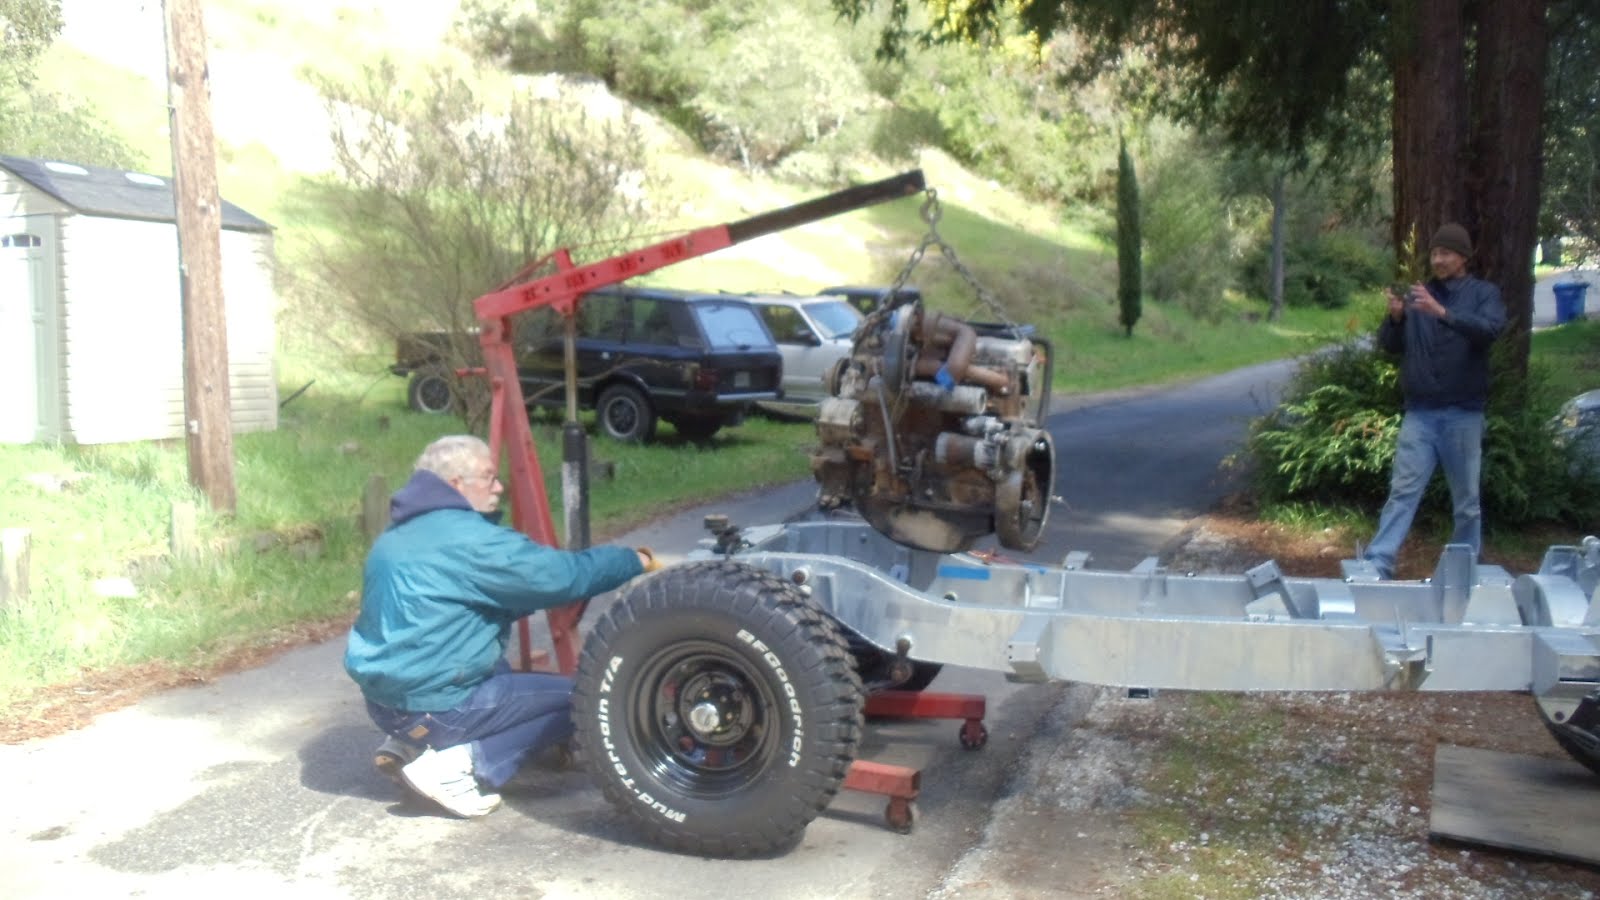
So we had to move the hoist out onto the street where it would roll. Then pull the trailer with the 2.5 in it out onto the street and pick the motor out. Put the trailer back, roll the 109 out so the front wheels were in the street and put the hoist in through the front. At this point we needed to reposition the engine as it was facing the wrong way. Then it was lower it down and put in the rubber mounts. Last was to push the 109 back into my drive and break down the hoist and put it away. All told it only took about 45 minutes start to finish.
Thanks to Brian and Matt for the help!
So I HAD to find the one I already modified to fit. I knew where it was and quickly searched the garage but it wasn't there. So I looked in the shed,, not here either. How about in the house or on the back porch? I have parts everywhere and will be glad when they are all in one place, on the 109! But no not in the house or on the back porch.
Back to the garage again and sort thru the mess with a flashlight. Not in this box, not in that one. Meanwhile Brian and Matt are catching up with each other. I go thru the stuff pretty quickly but still no joy. So now I make a more detailed search and halfway thru Matt joins me in looking. I've been looking for about an hour now and am totally frustrated. I KNOW I haven't thrown them out. So I search everything I haven't opened yet, still no joy.
I'm tired of looking and now it's getting too late to start the install so I send Brian and Matt home. We end the day with promises of if I find them then tomorrow we can put it in.
They leave and I go in for a late lunch wondering WTF did I do with 'em. Now it is about 1530H when I go back out to the garage with fresh batteries in the headlight and I start a systematic search in a counter clockwise motion. I open every box read the label on every bag and feel the contents. Move the large stuff and look under, in and around everything!
No joy :^(
So I start the same routine on the contents of the shed. I am back in the corner looking thru a box of bits and my neighbor comes over to talk. We chit chat and the topic of my search comes up and I explain what I am looking for. I am about to give up and order a replacement so I can modify it to fit.
My neighbor leaves and I see a plastic tub under my daughters 88, it's been knocked over and is upsidedown. I pull it out and remember it had stuff for the 2.5 in it. So I opened it and there was the motor mounts! I KNEW I had them somewhere!!!
So I called Matt and Brian and told them it was on for today! We met at 1100(well Brian and I, Matt showed at 1120) for coffee in town and after that we headed to my house.
So we had to move the hoist out onto the street where it would roll. Then pull the trailer with the 2.5 in it out onto the street and pick the motor out. Put the trailer back, roll the 109 out so the front wheels were in the street and put the hoist in through the front. At this point we needed to reposition the engine as it was facing the wrong way. Then it was lower it down and put in the rubber mounts. Last was to push the 109 back into my drive and break down the hoist and put it away. All told it only took about 45 minutes start to finish.
Thanks to Brian and Matt for the help!
Wednesday, February 22, 2012
Back to the 109
Well let's see the rims came in on Monday from Ok Offroading ( okoffroading.com). Brian and I took them down on Tuesday to get the new KM2's swapped onto the new rims. Lloyds Tire Service swapped them over and there was no charge! They balanced up much better than the others! One of them only needed 1 weight the others used 2, 1 on each side.
Brought them home and took em right from the truck to the axle! They went on easy and no clearance issues with the calipers!!! I then put together the steering rods and put them on that evening. I was hoping to be able to drop the 109 on the ground that evening but ran out of daylight Today I went out to run the wiring from the front to the back, you know, the one that runs thru the frame rail. I had run a fish through it last month for when the harness came in I'd be ready.
It took a bit to get the wiring figured out as it came without any info on what went where. So I sat around with my 3 wiring diagrams for Series 2 and 3 and 90/110 trying to figure out what went where. Finally I had sorted the frame rail bit from the rest.
I tied it to the fish and wrapped it with tape to keep it from catching on anything and pulled it into place carefully. But something was wrong (AGAIN!) No matter what I did it was too short! So I emailed the supplier(British Wiring)complete with pictures. They emailed back that they think that an 88 harness was sent instead of a 109 and they would check to see if they had a 109 instock Does this stuff happen to everybody or just me?
So I put away all the wiring bits and installed the grab bumpers on the rear cross members. Then using My daughters fiance's engine hoist I picked up each end of the frame, removed the saw horses and lowered it to the ground! Yaayyy!!! I now have a rolling chassis I removed the white hubcaps from the rear hubs and replaced them with the new ones I picked up from Rovah Farm.
I hope that tomorrow will bring me news of the wiring fix......
There is a busy weekend coming up I have to work on Sat for my friend and Sunday is the memorial for Kathy, that is going to be a tough, sad day.
Brought them home and took em right from the truck to the axle! They went on easy and no clearance issues with the calipers!!! I then put together the steering rods and put them on that evening. I was hoping to be able to drop the 109 on the ground that evening but ran out of daylight Today I went out to run the wiring from the front to the back, you know, the one that runs thru the frame rail. I had run a fish through it last month for when the harness came in I'd be ready.
It took a bit to get the wiring figured out as it came without any info on what went where. So I sat around with my 3 wiring diagrams for Series 2 and 3 and 90/110 trying to figure out what went where. Finally I had sorted the frame rail bit from the rest.
I tied it to the fish and wrapped it with tape to keep it from catching on anything and pulled it into place carefully. But something was wrong (AGAIN!) No matter what I did it was too short! So I emailed the supplier(British Wiring)complete with pictures. They emailed back that they think that an 88 harness was sent instead of a 109 and they would check to see if they had a 109 instock Does this stuff happen to everybody or just me?
So I put away all the wiring bits and installed the grab bumpers on the rear cross members. Then using My daughters fiance's engine hoist I picked up each end of the frame, removed the saw horses and lowered it to the ground! Yaayyy!!! I now have a rolling chassis I removed the white hubcaps from the rear hubs and replaced them with the new ones I picked up from Rovah Farm.
I hope that tomorrow will bring me news of the wiring fix......
There is a busy weekend coming up I have to work on Sat for my friend and Sunday is the memorial for Kathy, that is going to be a tough, sad day.
Subscribe to:
Posts (Atom)